The version 2 API of the iOS SDK offers a number of enhancements and features that simplifies the use of the SDK. This guide will provide examples for each of the available functions in our iOS SDK along with a step by step guide on how to create a gimbal sdk enabled application.
If this is your first time working with the Proximity Framework visit the Proximity Overview »
Places Version 2 API introduces the concept of places. A Place can be represented by a single geofence and/or a series of beacons. Thus, when you create a Place in Gimbal Manager you can draw a geofence and/or choose a set of beacons to define the Place. Gimbal Analytics in v2 will be generated at place level. As a developer, you would add Communications or other triggers to occur on a Place Entry or Exit.
Go to the Gimbal Manager and sign up to create a new account.
The following steps will set up an application in Xcode ready for enabling Gimbal features.
Important If you are creating an Xcode project with Swift, place visit the Swift Quickstart »
Make sure you are:
In Xcode choose File > New > Project and create a new Application
Please select the appropriate target from the list in the left column of the project editor
The Gimbal Framework can be added either by using CocoaPods or manually.
Check out these guides for more information on installing CocoaPods and setting up your new or existing application with CocoaPods.
Add the following to your PodSpec file:
target 'MyApp' do
pod 'Gimbal'
end
Find more info about the Gimbal pod here
Important Click on your workspace in the top left of xcode and then select the build target. At the bottom of the general tab, add Gimbal to "Embedded binary. This will also add Gimbal to "Linked Frameworks and Libraries"
Note You will find this framework in the
Frameworks folder inside the Gimbal SDK zip file.
Please select the checkbox for Copy items if needed.
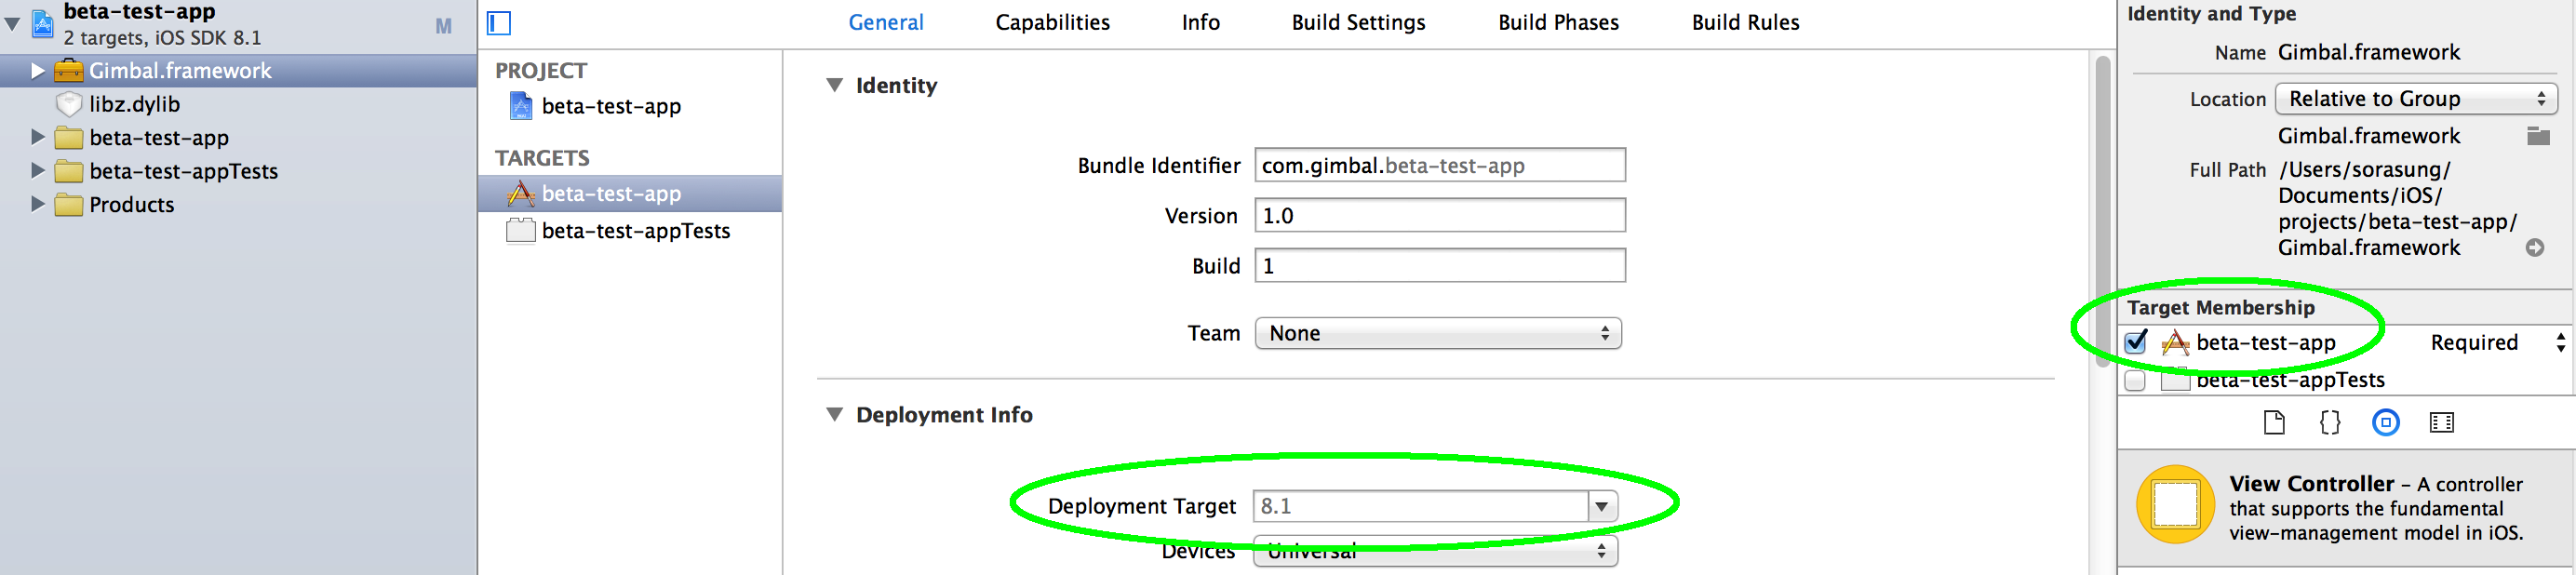
It is strongly recommended to add the Gimbal Framework using this method to ensure that the Target Membership checkbox is enabled properly. If an alternate method is used, then the Target Membership of the frameworks must be verified and checked.
The 'Linked Frameworks and Libraries' in your General tab should now look like this:

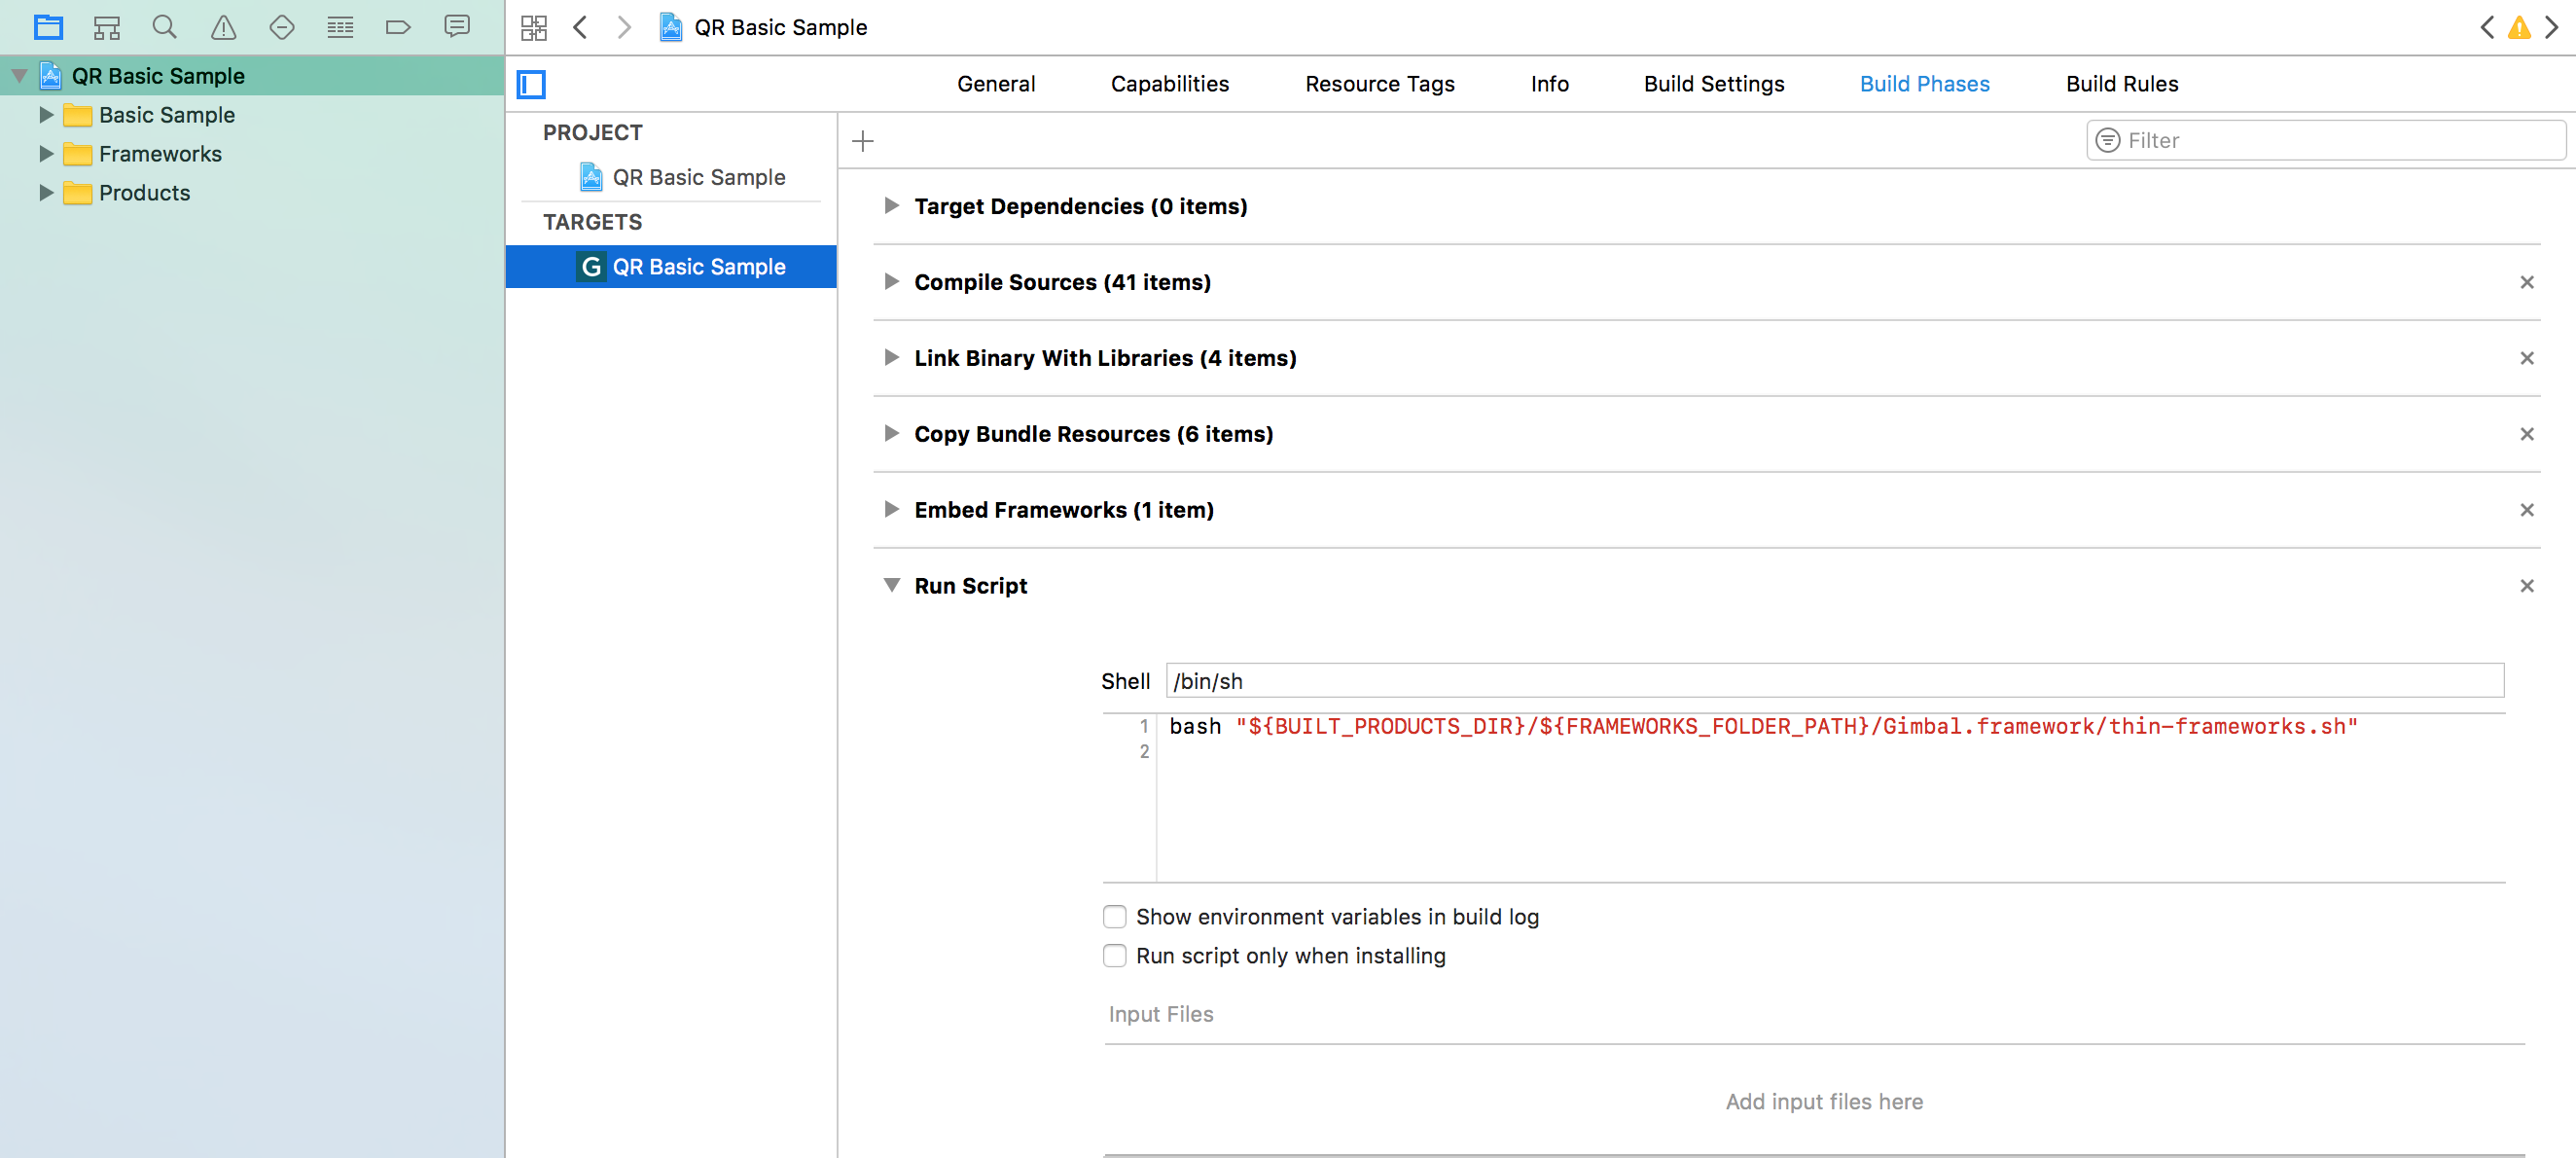
Because Gimbal is a dynamic framework, a work around is required in order to push your app to the App Store because of a bug in Apple's submission process. In your app target's "Build Phases", add a new "Run Script Phase" with the following script:
Verify that the Gimbal Framework Target Membership checkbox is set. Also verify that your Deployment Target matches the iOS version of your device. While
Gimbal SDK for iOS uses both Significant Location Change and Region Monitoring features of the iOS. In order to allow for this, multiple entries are required in the property list. In the Info.plist file located in the 'Supporting Files' folder, add new entries with keys 'NSLocationAlwaysAndWhenInUseUsageDescription', and 'NSLocationWhenInUseUsageDescription'. The values should contain a user visible string describing the app’s need for location permissions.
Starting in iOS 10, Apple requires addition permissions for using Bluetooth peripherals, such as Gimbal Beacons. Similar to before, add a new entry to your Info.plist with a key of 'NSBluetoothPeripheralUsageDescription' and value as the descriptions as to why you are using Bluetooth peripherals.
Starting in iOS 11, Apple will prompt users with the "Always" and "When In Use" location options. You can request only the "Always" location permission instead of "When In Use" on iOS 10 and below, which is managed by the "NSLocationAlwaysUsageDescription" property.
| Key | Type | Value |
|---|---|---|
| NSLocationAlwaysAndWhenInUseUsageDescription | String | Location is used to monitor Gimbal Places |
| NSLocationWhenInUseUsageDescription | String | Location is used to monitor Gimbal Places |
| NSLocationAlwaysUsageDescription | String | Location is used to monitor Gimbal Places |
| NSBluetoothPeripheralUsageDescription | String | Bluetooth is used to listen for Gimbal Beacons |
Create Your Gimbal Application in the Gimbal Manager.
You will be presented with a form where you will enter the following information: Name of your app, Platform (ios), App category, and Bundle ID.
Note This is where you would enter the Xcode application Bundle ID created in the previous section 'Create Your iOS Application'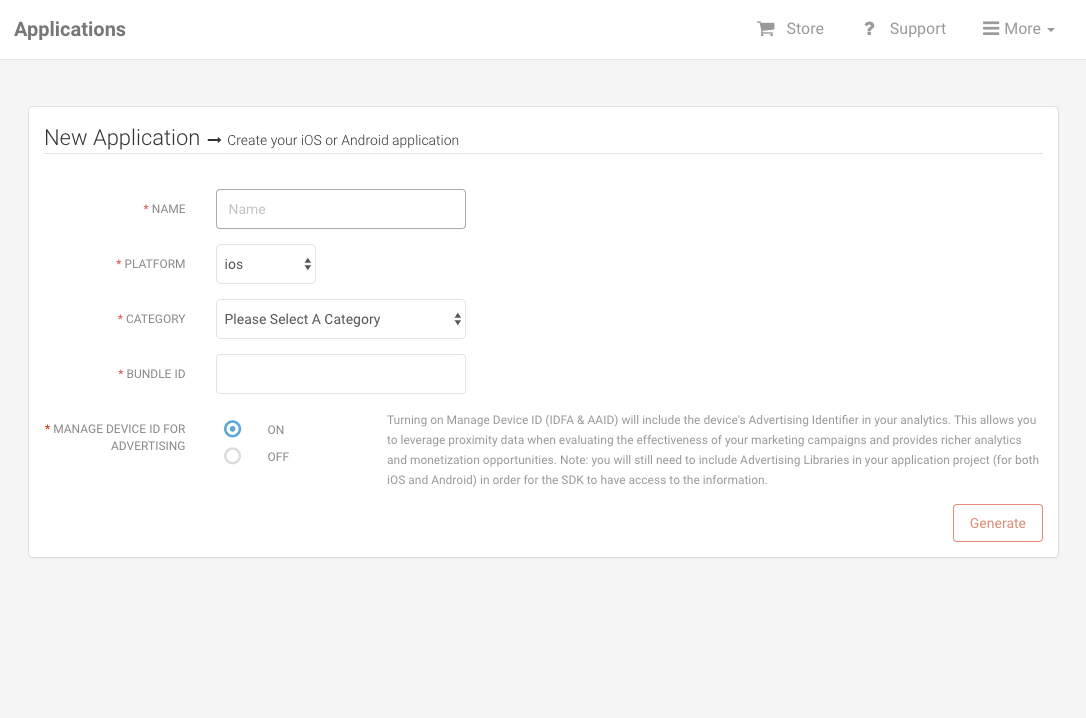
Hit the 'Generate' button. Once finished, your app will have a Gimbal API Key.
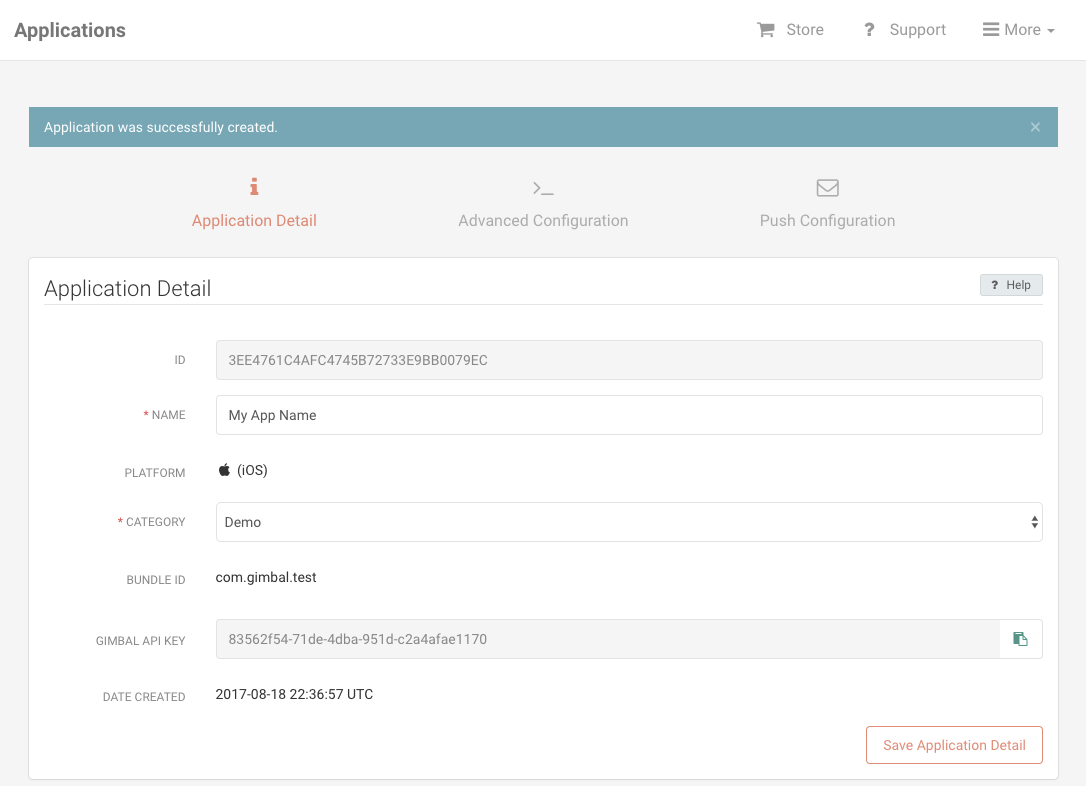
Important You will need to set the API Key in your Xcode App
You will be presented with a form where you will enter information about your Place. A Place represents both Geofence and Proximity. For example, a place can be represented by a geofence (circular or polygonal) or a series of beacons.
Please enter your Place information. For example, you can enter a Place name and enter your activated beacon(s). You can always update your Place by adding a Geofence or add/delete your beacons.
Note This is where you would enter the Place(s) where you will look for Place Events in your app.
You will be presented with a form where you will enter information about your communication. For example a Communication can be entered for a place and when an app enters the specified place, a notification will be received. Please select 'Save & Publish' to activate your communication.

There are a number of application settings that you can configure. These can can be found by clicking on the Application’s Bundle ID / Package Name within Gimbal Manager.
The following settings control how place events are triggered. Note: any of the similar settings you set for a Place take precedence over these app-wide settings.
The 'Arrival RSSI' setting allows you to specify a specific RSSI (signal strength) to be used in determining if a beacon sighting should be processed as an arrival to a beacon. Signals weaker than 'Arrival RSSI' will be ignored.
Default = null, such that whenever a beacon is first detected it will cause a sighting and an arrival.
You may wish to modify this value if you wish to decrease the range of when a beacon trigger an arrival.
The 'Departure RSSI' setting allows you to specify a specific RSSI (signal strength) to be used in determining if a beacon sighting should be processed as a departure. Signals weaker than 'Departure RSSI' will be ignored.
Note that the Departure RSSI must be at least 10dBm lower than the 'Arrival RSSI'. This is done to avoid excessive bouncing (where arrival and departures events are triggered repeatedly, even when both the mobile device and beacon are standing still).
The ‘Departure interval’ is the number of seconds that must elapse where the SDK does not see a beacon RSSI level stronger than the Departure RSSI before processing the departure.
The smoothing algorithm processes RSSI signal strengths from sightings to make them less jumpy. The larger the smoothing window the more steady the output RSSI readings will be.
These settings allow you to turn specific features on/off.
Allows you to turn on/off geofencing monitoring.
This may be desired if your application only uses beacon-based places.
Allows you to turn off beacon monitoring. This will affect both beacon-based Place detection and beacon detection.
This may be useful if your application only uses geofence-based places.
Allows you to turn on/off Communicate delivery.
This may be useful if your application does not use the Communicate feature.
Allows you to turn on/off whether Gimbal records the device advertising identifier and limit ad tracking state for devices. Turning this on is necessary if you wish to correlate your advertising data with the data collected by the Gimbal SDK. This functionality is off by default. Your application must include the AdSupport framework to use this feature.
Important Apple may reject your app if you include the AdSupport Framework without including ad functionality. Be sure to remove the AdSupport Framework if your app does not serve advertising.
Note For privacy reasons, when a device's advertising identifier is reset, the device is re-registered with Gimbal and receives a new application instance identifier.
The configuration for communication limit frequency can be found in the 'Communicate' tab then the 'Triggers' section in Gimbal Manager.
The following settings are used to limit frequency when triggering communications for place events.
Selecting 'Yes' in the 'Limit Frequency' drop-down displays additional options for setting the frequency interval.
The 'Only Deliver Once Every' setting allows you to specify the value in hours, days or weeks for the communication frequency. Please note, one day specifies a 24hr period. One week specifies a 168hr period. For example, if the frequency limit is set for one day, then a user who initially receives a communication at 4pm won't get that same communication until after that 24hr period, no matter how often the user comes back in and out of the triggering place.
Important
If your CommunicationManagerDelegate implements communicationManager:presentLocalNotificationsForCommunications:forVisit:, you MUST handle frequency limit and delay (dwell) yourself.
The configuration for communication delay can be found in the 'Communicate' tab under the 'Triggers' section in Gimbal Manager.
Setting delay on a communication allows the communication to be delivered with some delay after a person has entered or exited a place. If a communication is scheduled to be delivered with some delay after a person has entered a place and the person exits that place before the communication is delivered, then the communication will be canceled. Similarly, if a communication is scheduled to be delivered some time after a person leaves a place and that person re-enters the place, the communication will be canceled.
Keep in mind that if delay causes a communication to be scheduled after the expiry date of the communication, it will not be delivered.
Important
If your CommunicationManagerDelegate implements communicationManager:presentLocalNotificationsForCommunications:forVisit:, frequency limit and delay (dwell) are honored only for communications returned by that method to the Gimbal SDK. Only use communicationManager:presentLocalNotificationsForCommunications:forVisit: if you want to handle scheduling and delivery of communications yourself.
Provisioning Profiles control which devices can run your app and which services your app can access. Provisioning Profiles are embedded in an app's bundle and then installed on a device before the app is run. If the information in the Provisioning Profile doesn't match certain criteria, your app won't launch.
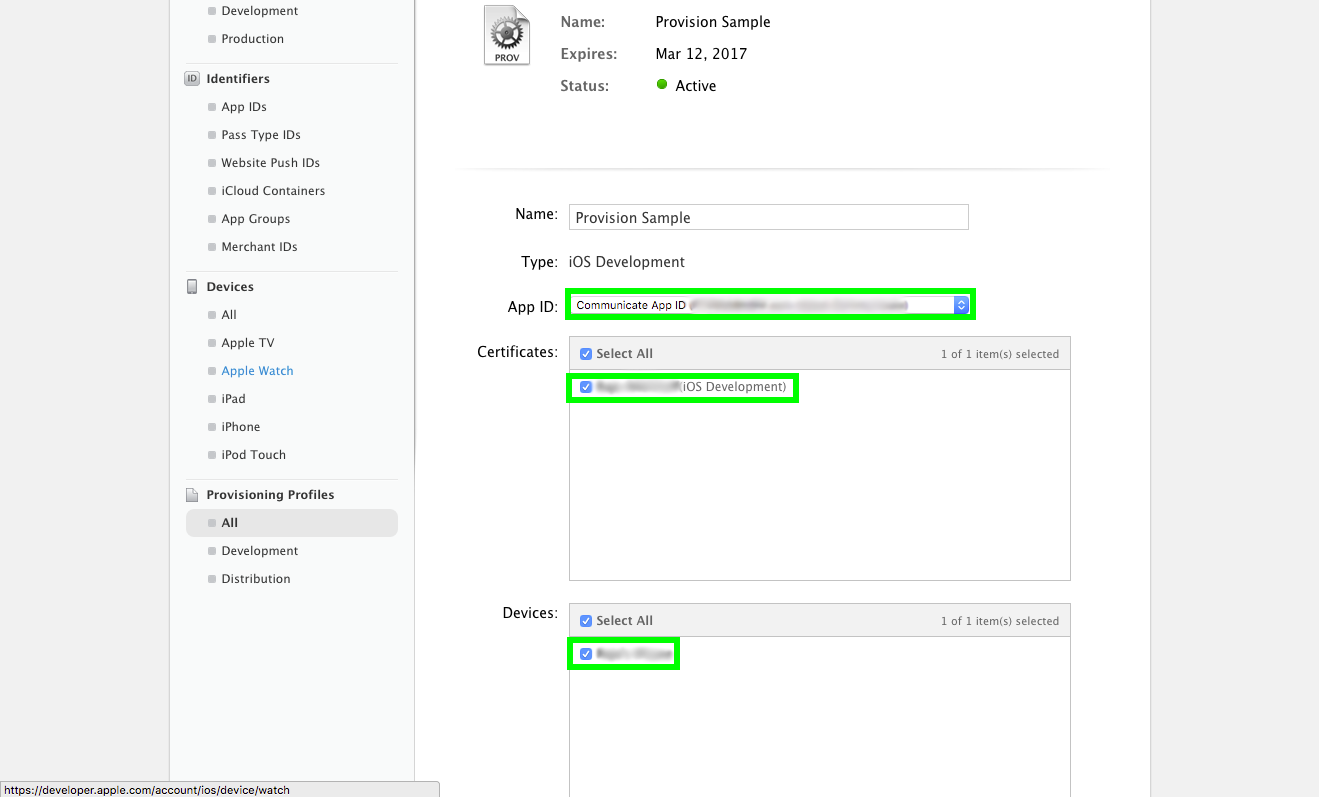
A Provisioning Profile contains three things:
Each unique combination of these three things requires its own Provisioning Profile.
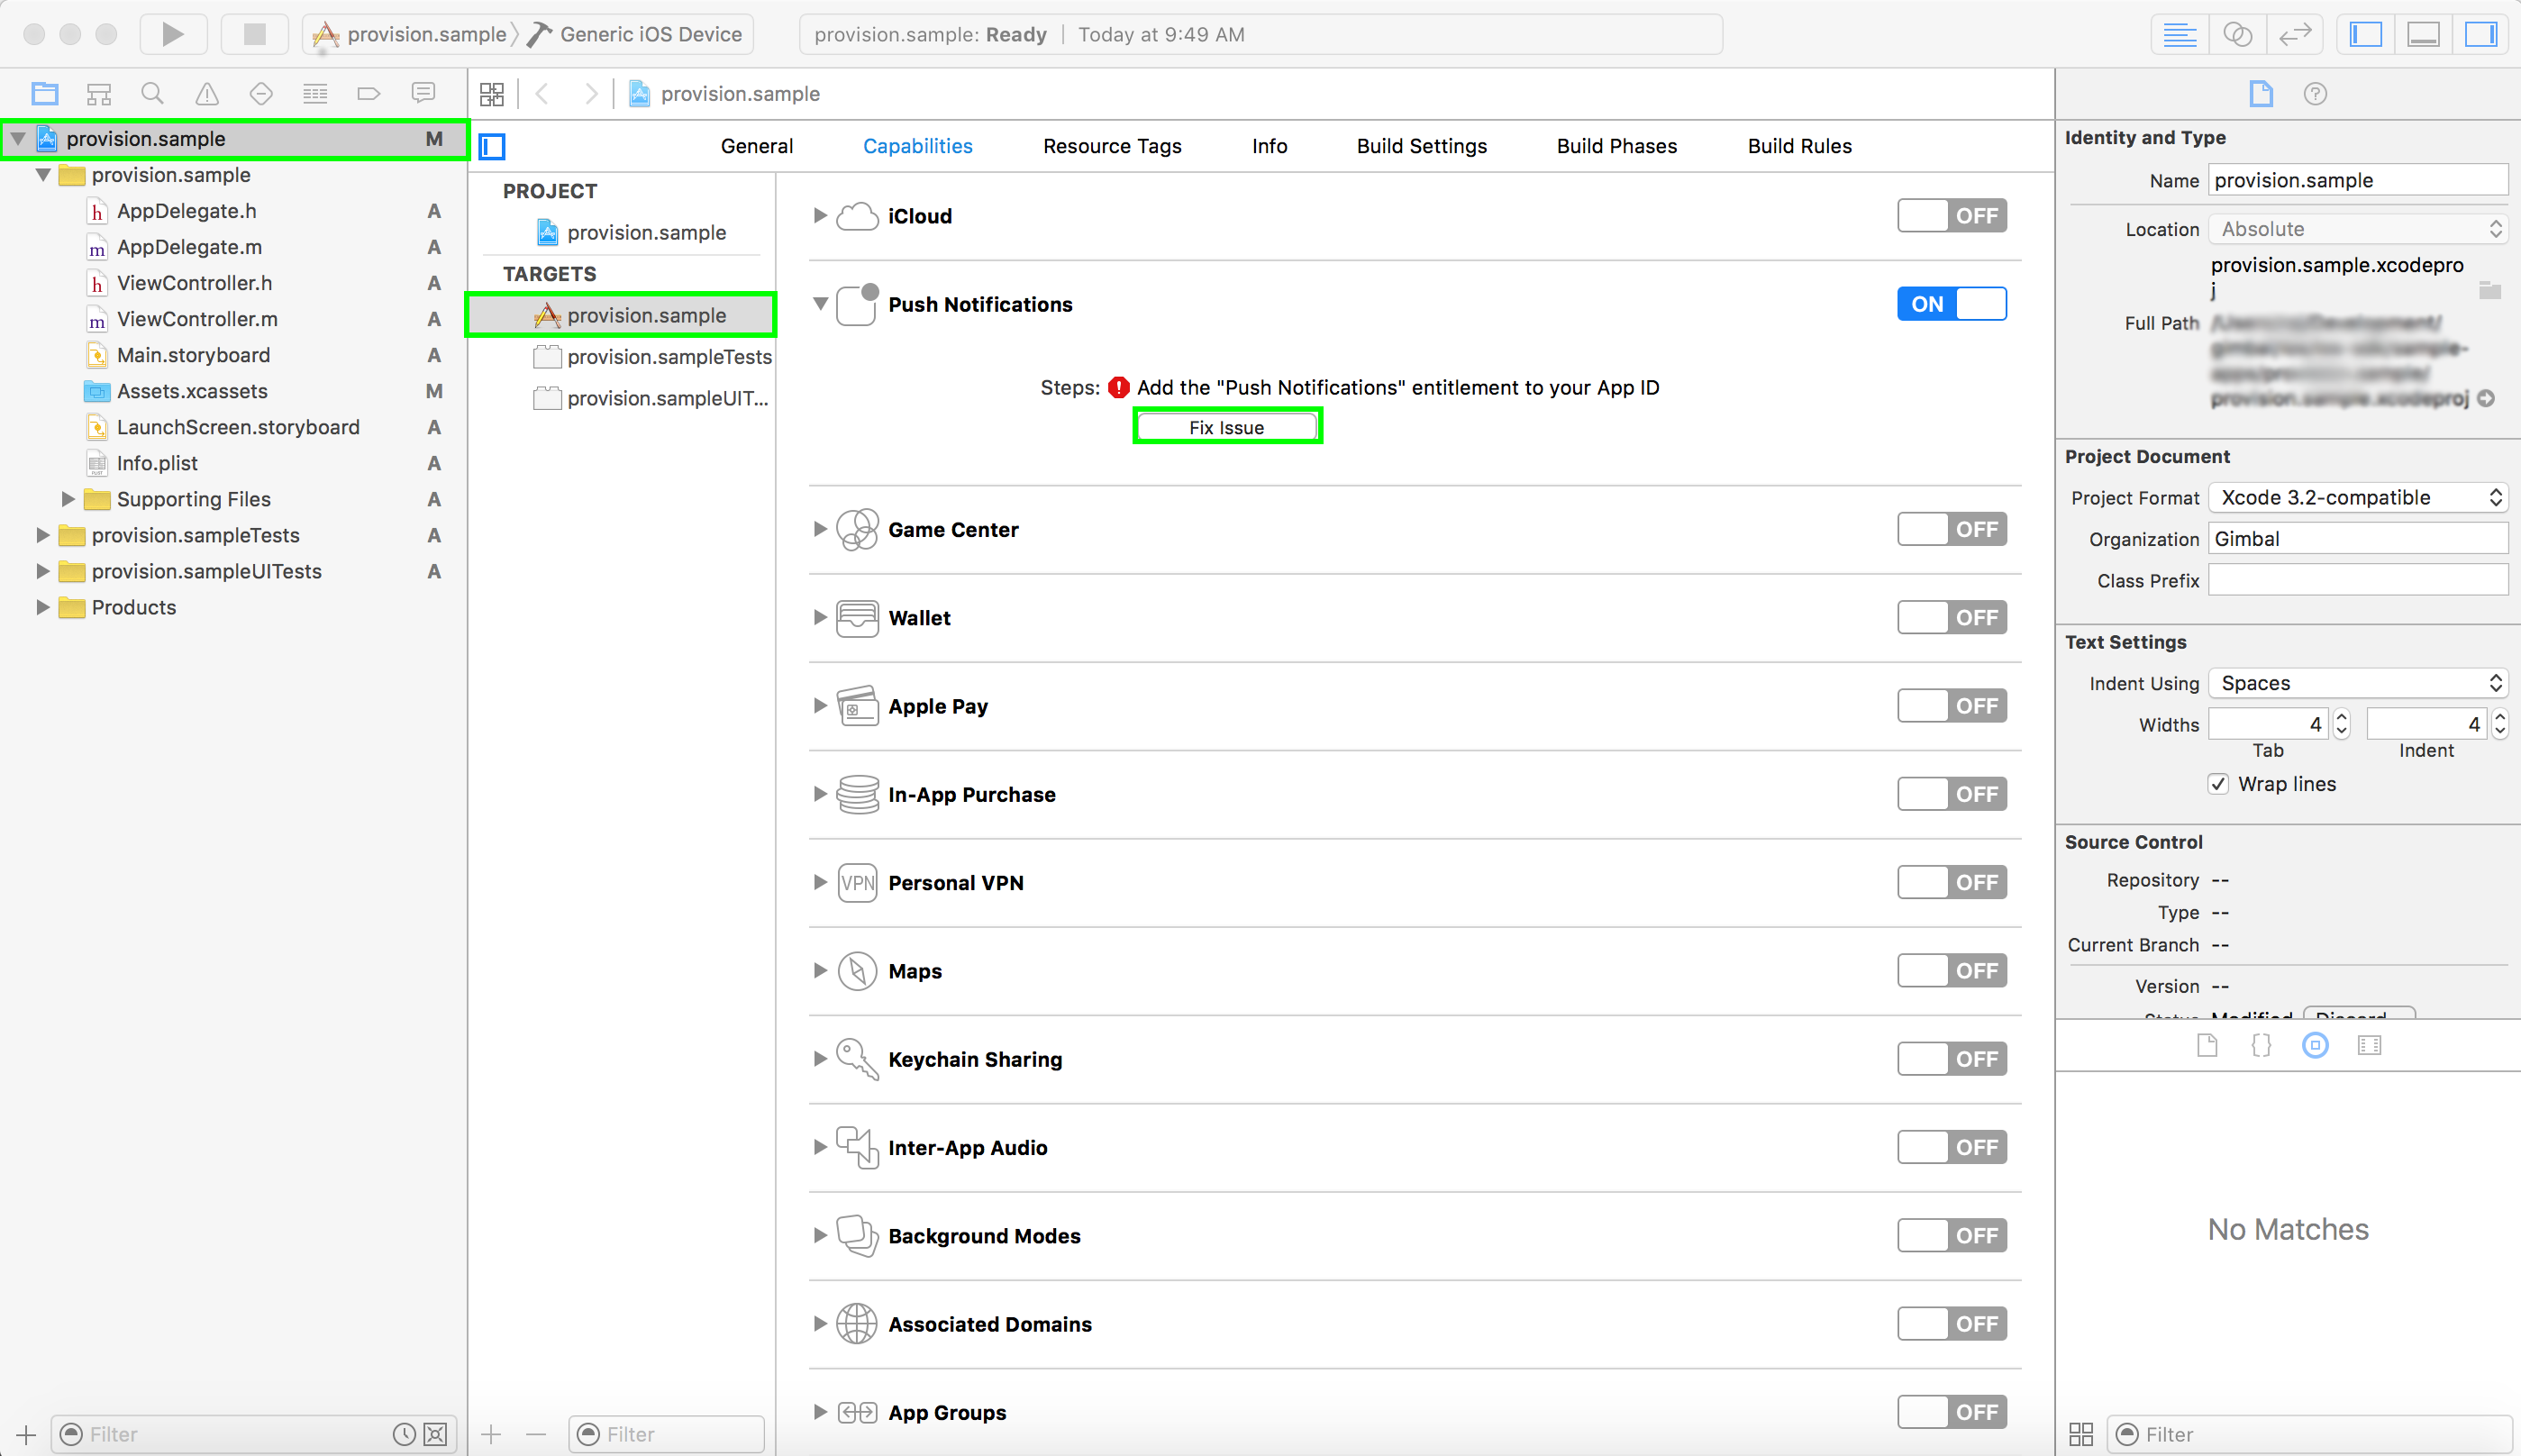
The App ID can be an id for a specific app or it can be a wildcard which matches all apps. A specific App ID is required if your app enables any services such as Push Notifications or Game Center. Therefore, if you add services to your app later during development, you may be prompted to create a new non-wildcard Provisioning Profile or to add the new service to your App ID.
If prompted in XCode, click the Fix Issue button.
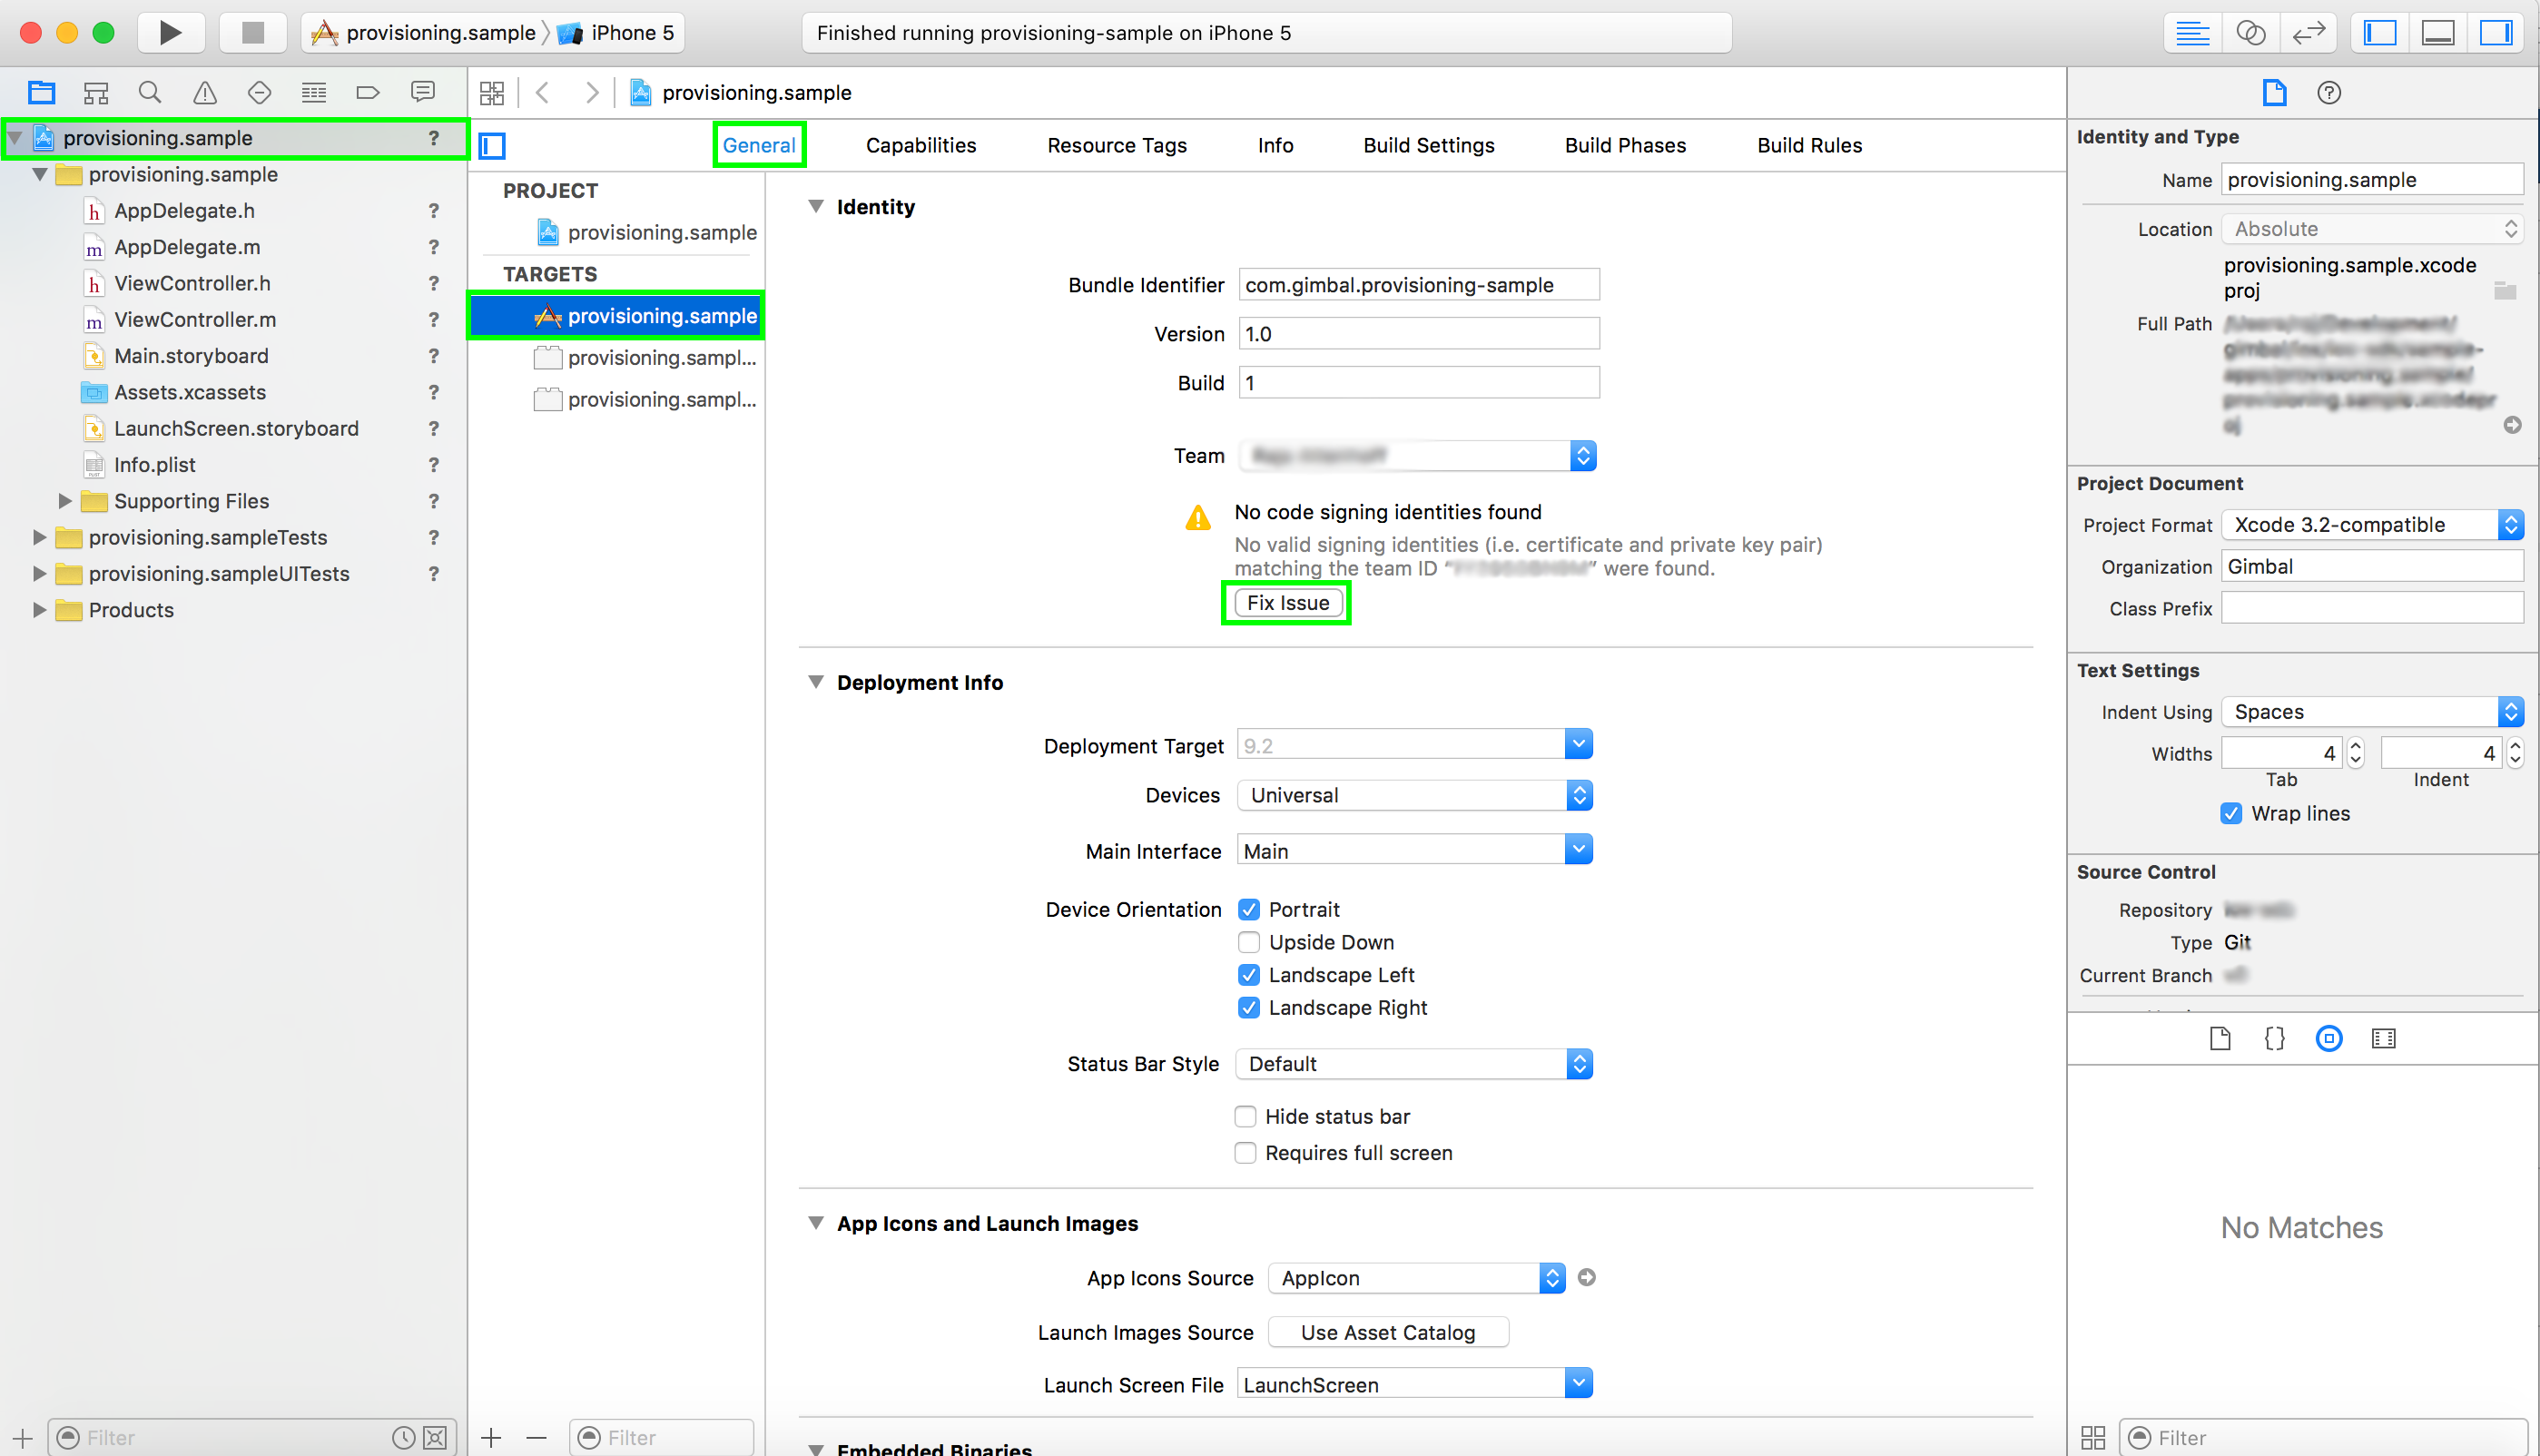
Each Provisioning Profile contains a List of Public Keys that can be used to sign the app. When a new developer begins work on the app her public key must be added to the provisioning profile. Similarly, if you revoke a developer's signing certificate you may need to create or update your provisioning profile.
If prompted in XCode, click the Fix Issue button.
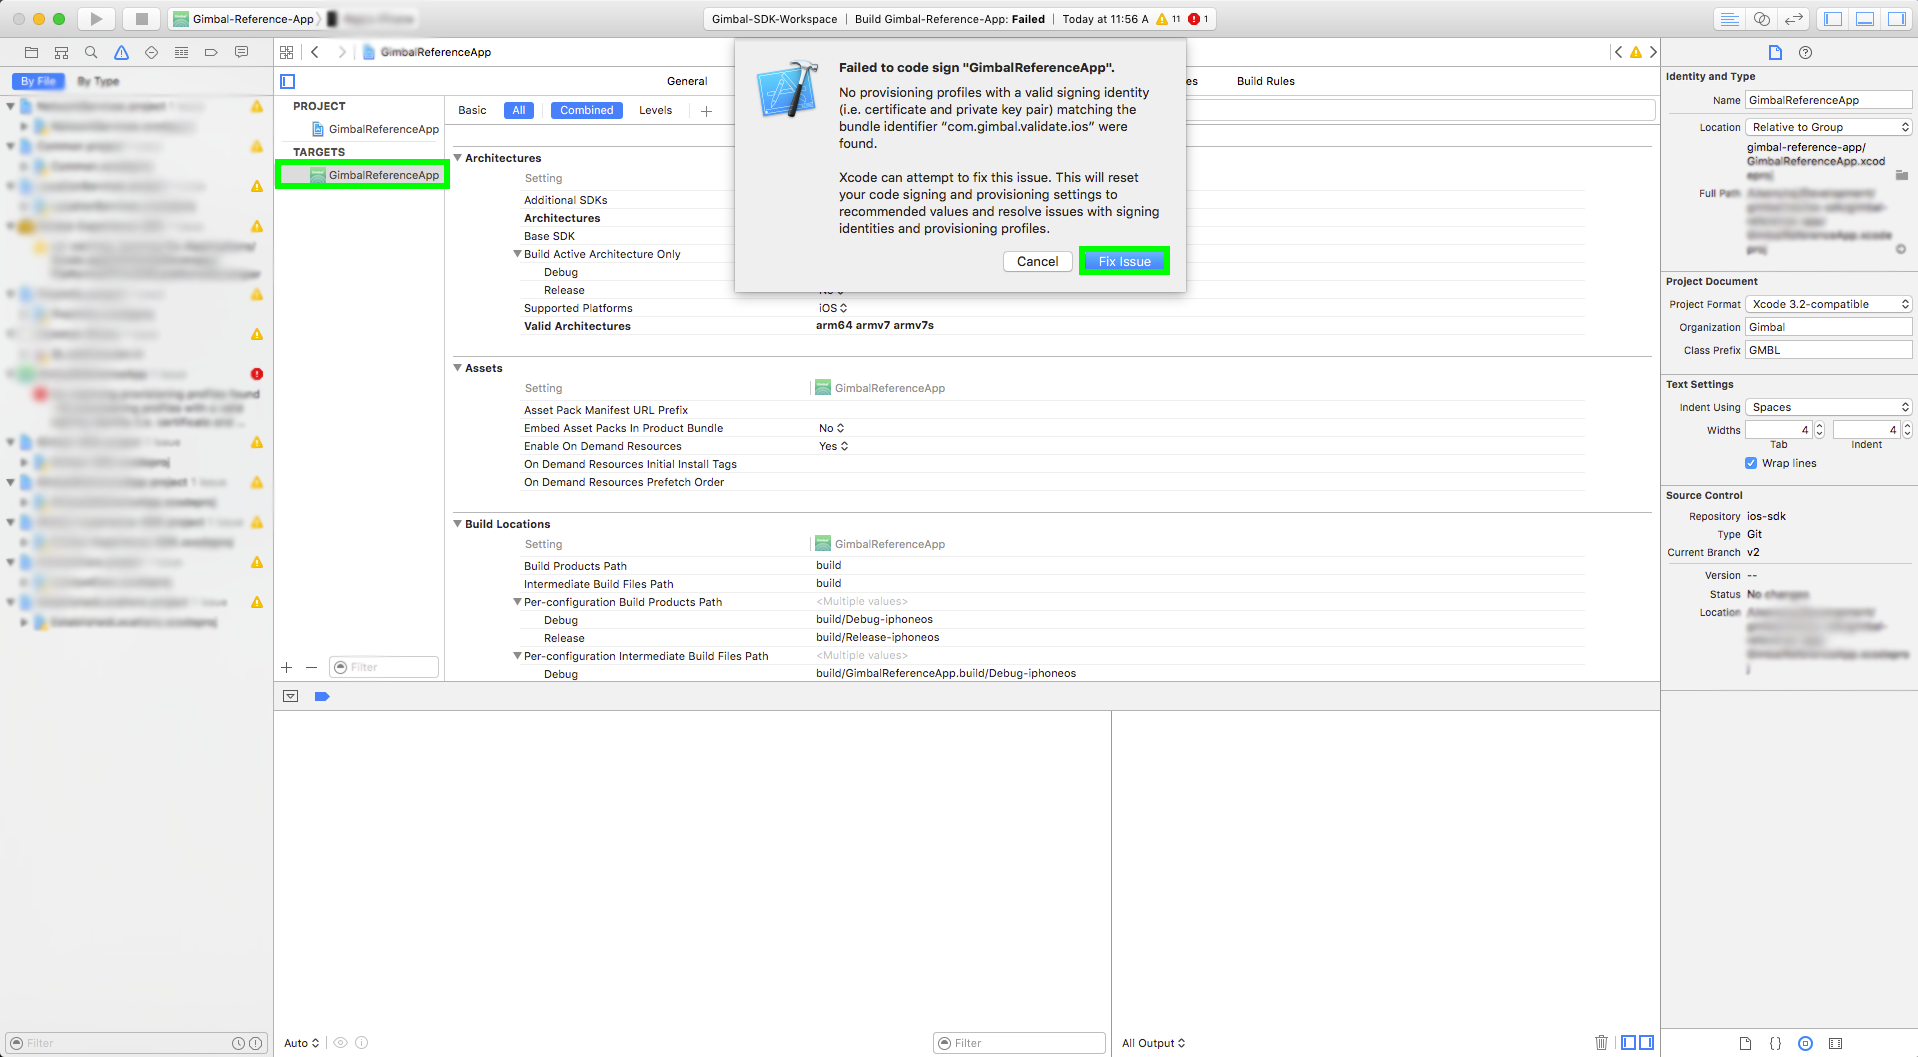
Similarly, you may see an error message like this:
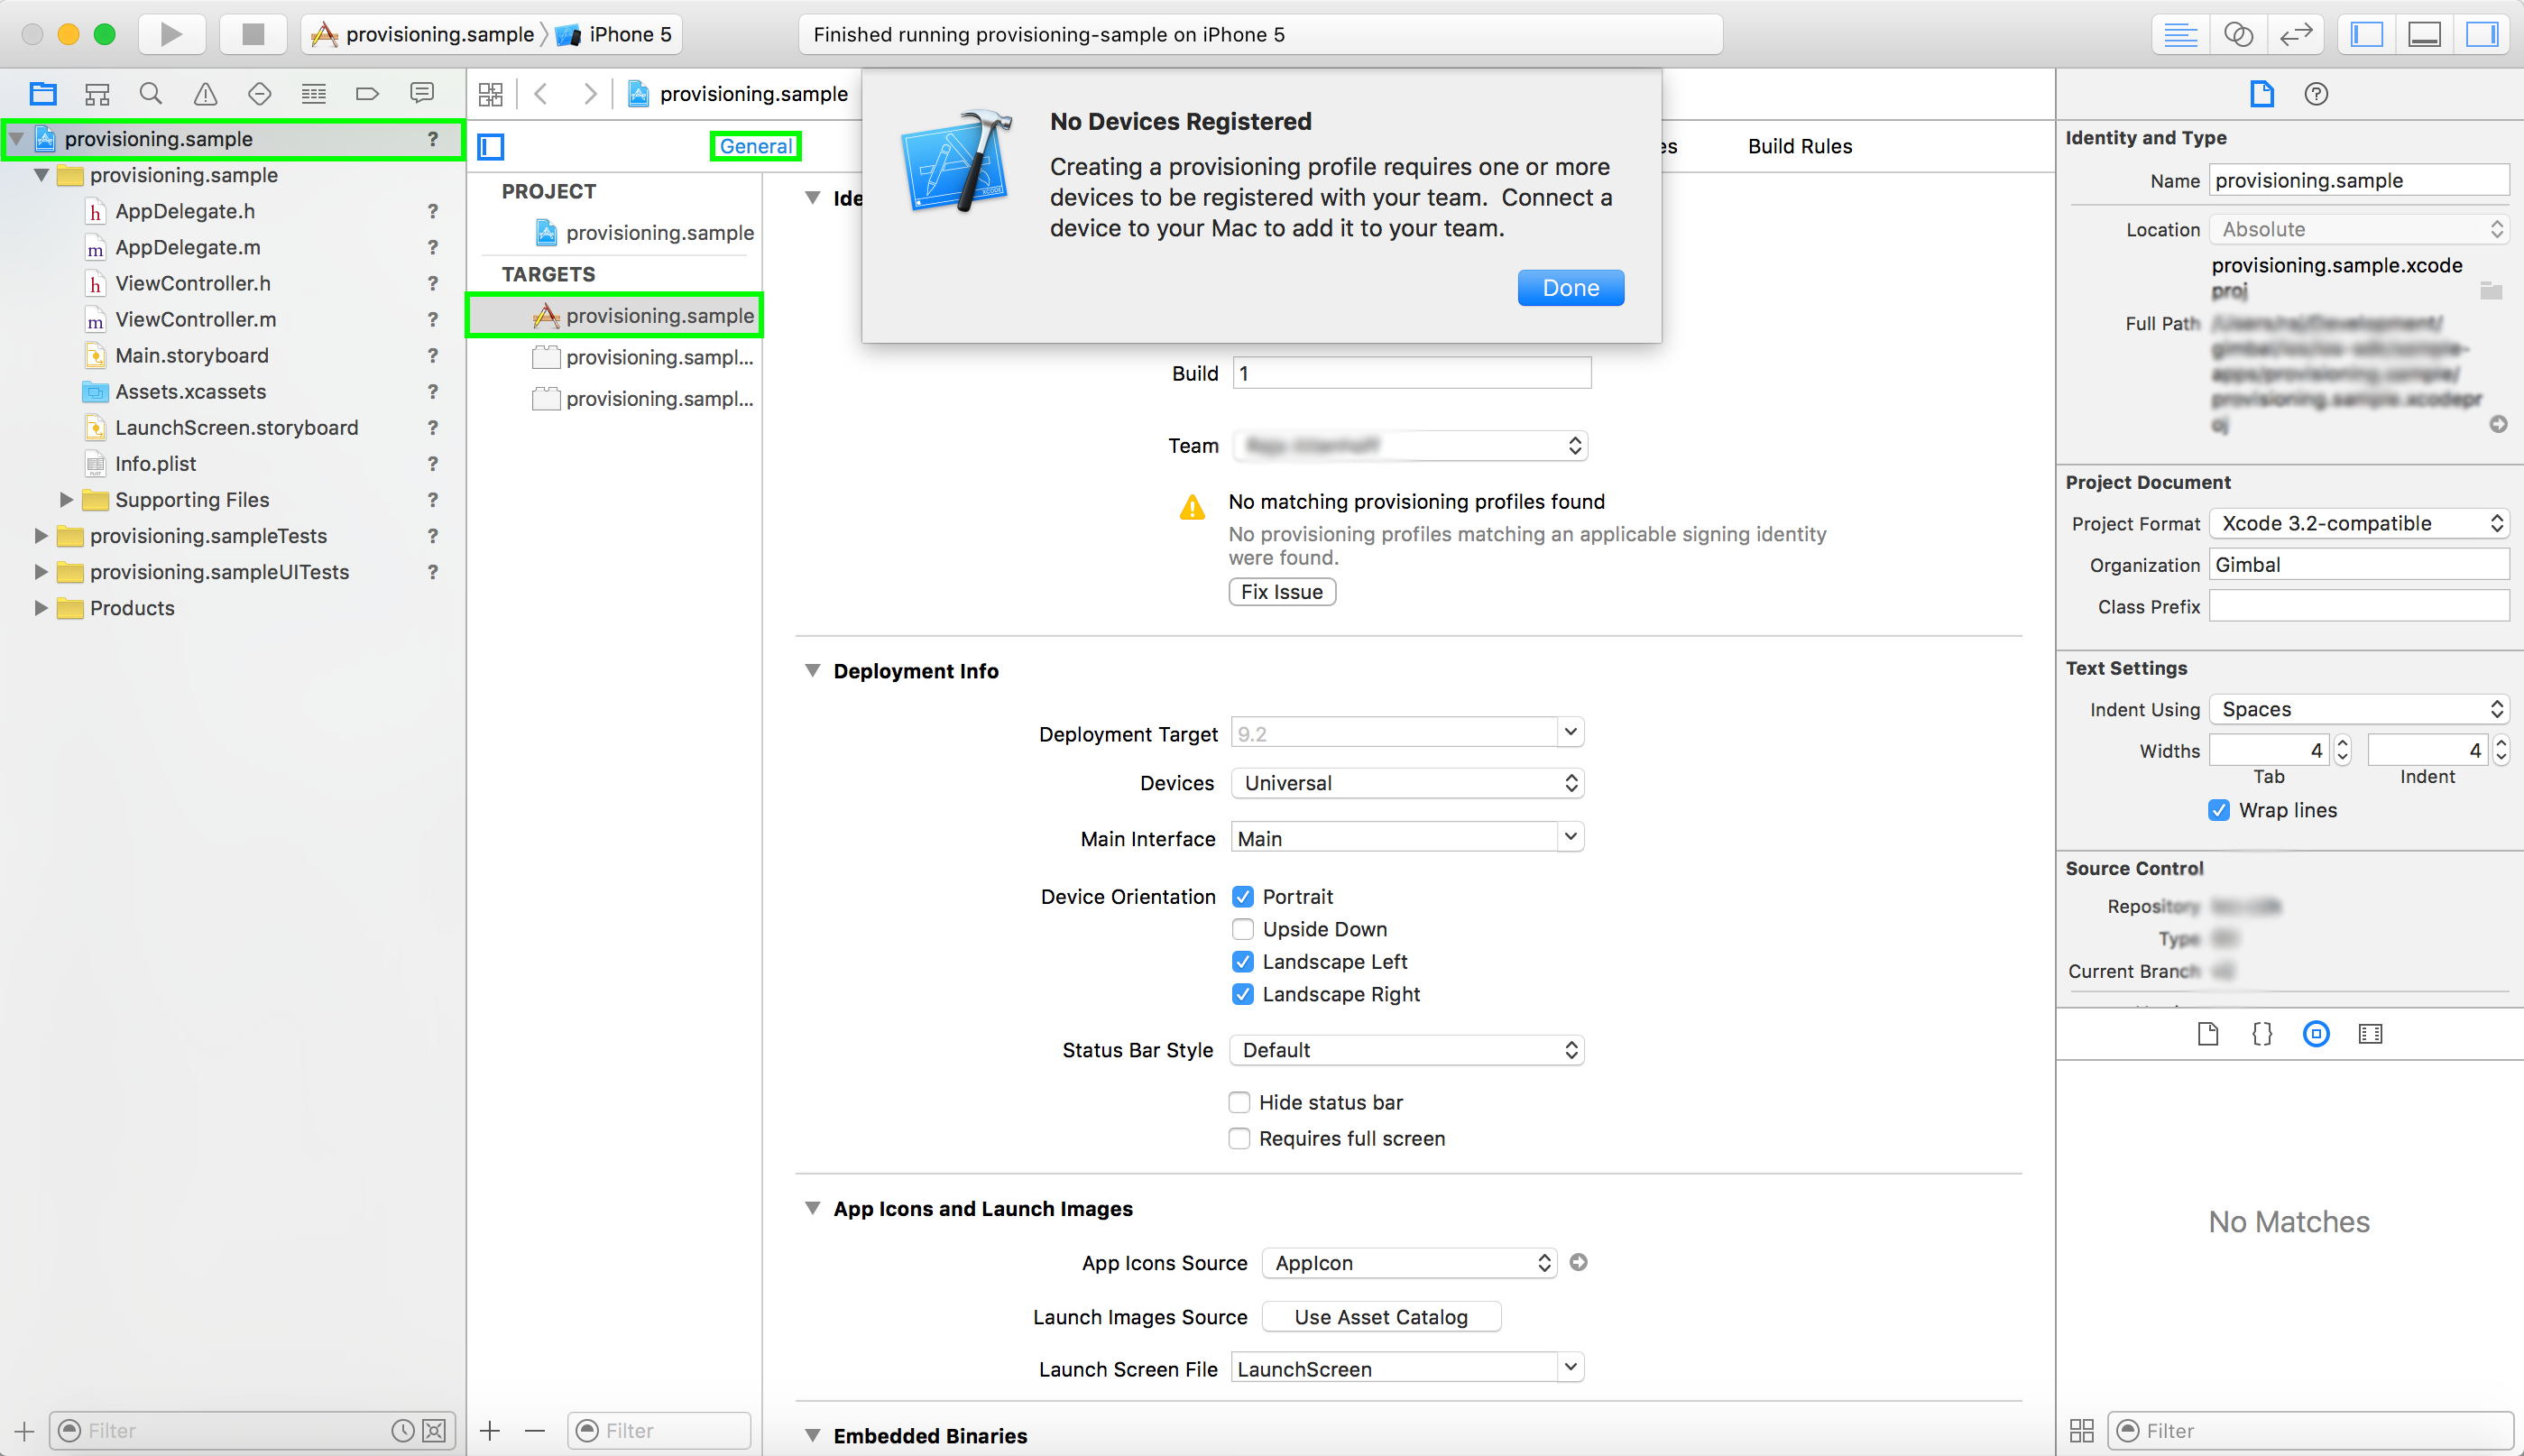
Each Provisioning Profile contains a List of Devices that can run the app. When you want to run the app on a new device, you must add that device to the Provisioning Profile.
Usually XCode can add your device if you connect it to your Mac.
There are two ways to manage your Provisioning Profiles:
XCode can create and manage Provisioning Profiles for you and by default it creates a type of Provisioning Profile called a Team Provisioning Profile which allows your app to by signed and run by all team members on all team member's devices. XCode will use the Provisioning Profile that uses the wildcard for the App ID if your app doesn't use any Apple services (like Push Notification or Game Center). If your app does use Apple Services, XCode will create a Team Provisioning Profile specific to that app.
To create a Provisioning Profile manually, log into the Apple Member Center, click on Certificates, Identifiers & Profiles

Click under the Provisioning Profiles section and then either select a profile to edit or click the "+" button.
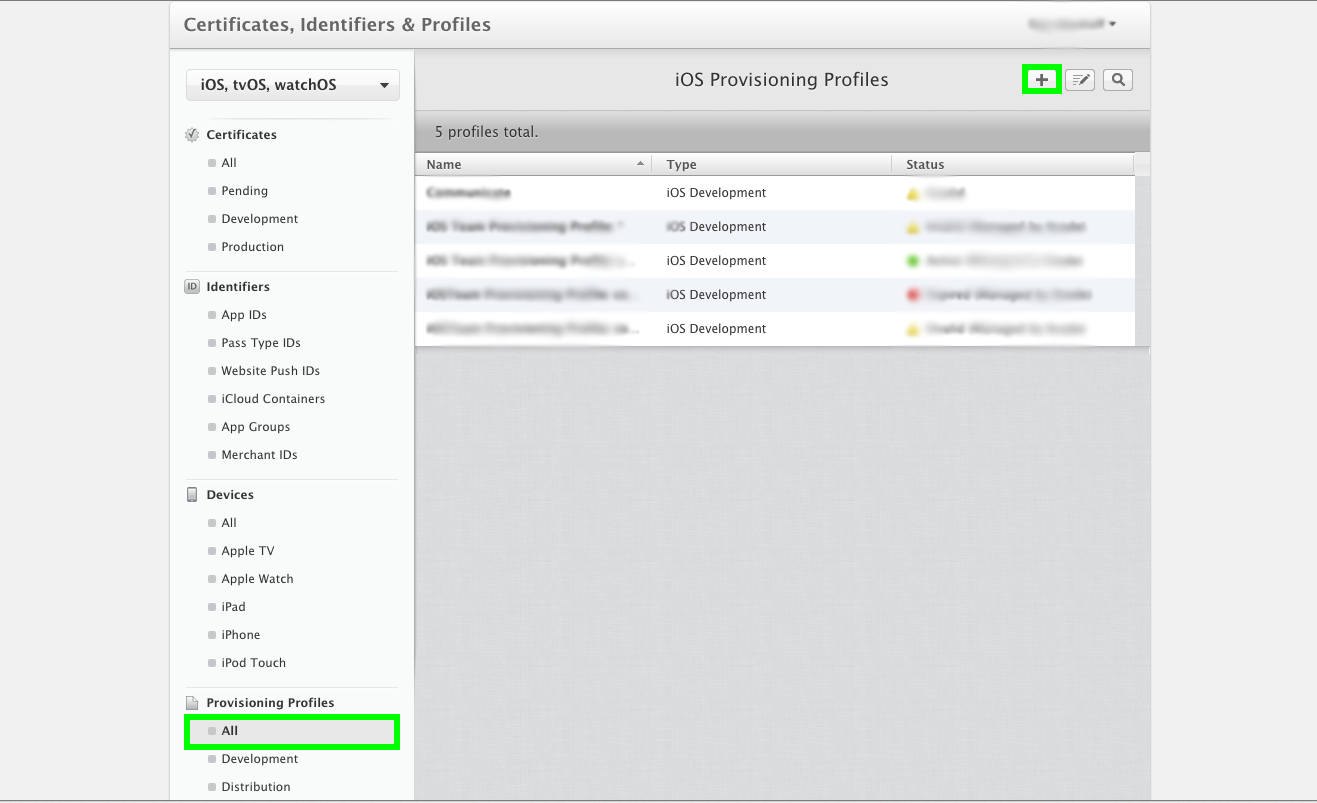
Select the type of Profile you need (Development or Distribution) and associate the Profile with an App, a List of Certificates, and a List of Devices.
This call sets the API key for your Gimbal application. When you register an application on the Developer Portal the API key is generated and supplied to you.
This was done in the previous section Create Gimbal Application.
    #import <Gimbal/Gimbal.h>
    ...
    [Gimbal setAPIKey:@"PUT_YOUR_GIMBAL_API_KEY_HERE" options:nil];
setAPIKey also prompts the user for access to their location. By default the user will be prompted with the options "Always", "While in use" or "Never". You can manage this request on your own in the options parameter by setting the key MANAGE_PERMISSIONS with a value of NO. You will then need to ask for location access on your own.
    #import <Gimbal/Gimbal.h>
    ...
    [Gimbal setAPIKey:@"PUT_YOUR_GIMBAL_API_KEY_HERE" options:@{@"MANAGE_PERMISSIONS":@NO}];
Note You can add this code in your AppDelegate implementation (.m) file in the didFinishLaunchingWithOptions: method, inserting your specific API Key
The Gimbal defines the interface for starting all the services like GMBLPlaceManager, GMBLCommunicationManager and GMBLEstablishedLocationsManager , stopping the services and finding the status.
Returns the Gimbal services state. It will return false if start was not called, or stop was called, on GMBLPlaceManager, GMBLCommunicationManager and GMBLEstablishedLocationsManager
    #import <Gimbal/Gimbal.h>
    ...
    [Gimbal isStarted];
Starts all the Gimbal services which includes the generation of events based on the users location and proximity to geofences and beacons, receive communications associated to place entry and exit events and generation of established locations based on the users locations. Its a method for starting the GMBLPlaceManager, GMBLCommunicationManager and GMBLEstablishedLocationsManager. These features can also be controlled server side anytime for a specific application using advanced configuration at Gimbal Manager
    #import <Gimbal/Gimbal.h>
    ...
    [Gimbal start];
Stops all the Gimbal services. Its a method for stopping the GMBLPlaceManager, GMBLCommunicationManager and GMBLEstablishedLocationsManager..
    #import <Gimbal/Gimbal.h>
    ...
    [Gimbal stop];
The Analytics Manager allows you to associate a unique ID specific to an app instance. This ID can then be used to cross-correllate the user's analytics events exported from Gimbal Manager. Examples of IDs include: Loyalty ID, Salesforce ID, and hashed email.
For more information please please refer to our Analytics User ID knowledge base article.
Associates the specified Analytics User ID to this app install, replacing the previous ID if any.
        #import <Gimbal/GMBLAnalyticsManager.h>
        ...
        [AnalyticsManager.sharedInstance setUserAnalyticsID:@"UserID"];
Disassociates a previously set Analytics User ID from this app install.
        #import <Gimbal/GMBLAnalyticsManager.h>
        ...
        [AnalyticsManager.sharedInstance deleteUserAnalyticsID];
The PlaceManager defines the interface for delivering place entry and exits events to your Gimbal SDK enabled application. You use this class to start or stop place monitoring and to check whether monitoring is enabled.
Check if place monitoring has started
    #import <Gimbal/Gimbal.h>
    ...
    [GMBLPlaceManager isMonitoring];
Starts the generation of events based on the users location and proximity to geofences and beacons.
    #import <Gimbal/Gimbal.h>
    ...
    [GMBLPlaceManager startMonitoring];
Stops the generation of events based on the users location and proximity to geofences and beacons.
    #import <Gimbal/Gimbal.h>
    ...
    [GMBLPlaceManager stopMonitoring];
The following gets visits for places that you are currently AT. The array returned is ordered ascending by arrival date.
    #import <Gimbal/Gimbal.h>
    ...
    [GMBLPlaceManager currentVisits];
The following creates a placeManager object and will trigger the callback to your
delegate of place events. Thereafter, you will be notified of
events for places your application is authorized for.
    #import <Gimbal/Gimbal.h>
    ...
    @property (nonatomic) GMBLPlaceManager *placeManager;
    ...
    self.placeManager = [GMBLPlaceManager new];
    self.placeManager.delegate = self;
    [GMBLPlaceManager startMonitoring];
Note Be sure to add the PlaceManager Delegate protocol to your class.
This is the callback delegate for place events.
Note You must add the <GMBLPlaceManagerDelegate>
protocol to your class.
The following callbacks will be invoked when a place event occurs.
    #import <Gimbal/Gimbal.h>
    ...
    - (void)placeManager:(GMBLPlaceManager *)manager didBeginVisit:(GMBLVisit *)visit
    {
        // this will be invoked when a place is entered
    }

    - (void)placeManager:(GMBLPlaceManager *)manager didBeginVisit:(GMBLVisit *)visit withDelay:(NSTimeInterval)delayTime
    {
        // this will be invoked when a place is entered and one has remained in that place
        // longer than the specified dwell time.
    }

    - (void)placeManager:(GMBLPlaceManager *)manager didEndVisit:(GMBLVisit *)visit
    {
        // this will be invoked when a place is exited
    }

    - (void)placeManager:(GMBLPlaceManager *)manager didDetectLocation:(CLLocation *)location
    {
        // This will be invoked when Gimbal has detected a reliable location.
    }

    - (void)placeManager:(GMBLPlaceManager *)manager didReceiveBeaconSighting:(GMBLBeaconSighting *)sighting forVisits:(NSArray *)visits
    {
        // this will be invoked when a beacon assigned to a place within a current visit is sighted.
    }
The GMBLVisit class defines a visit to a place. It includes the place, the arrival date and the departure date to the place. If the visit is currently on-going, the departure date will be nil.
| Property Name | Type | Description |
|---|---|---|
| arrivalDate | NSDate | Arrival date for the visit |
| departureDate | NSDate | Departure date for the visit |
| place | GMBLPlace | Place associated with visit |
| dwellTime | NSTimeInterval | Dwell time for the visit |
| visitID | NSString | Unique ID for visit |
The GMBLPlace class defines a place which is represented by a geofence (circular or polygonal) or a series of beacons. A place is defined in the Gimbal Manager portal.
| Property Name | Type | Description |
|---|---|---|
| identifier | NSString | Unique identifier for this place |
| name | NSString | Name assigned to this place |
| attributes | GMBLAttributes | Attributes of this place |
The GMBLBeaconSighting class defines a beacon sighting.
| Property Name | Type | Description |
|---|---|---|
| RSSI | NSInteger | The rssi value for the beacon sighted |
| date | NSDate | The field representing the beacon sighted date |
| beacon | GMBLBeacon | The beacon object with beacon attributes |
The Gimbal SDK uses CLLocationManager region monitoring to track when a user enters a Gimbal Geofence or iBeacon. Because the application and the SDK both use the same CLLocationManager, this can create the possibility of an application's location's stepping on Gimbal's locations. If you do choose to monitor your own regions in addition to Gimbal places, be sure when removing your regions from CLLocationManager that they are your own regions and not regions owned by Gimbal. Deleting regions incorrectly will result in missed place events in the Gimbal SDK.
The CommunicationManager defines the interface for delivering communications to your Gimbal SDK enabled application. You use this class to start or stop receiving communications.
Enables the SDK to receive communications.
[GMBLCommunicationManager startReceivingCommunications];
Stops all communication delivery. This includes both local and instant(push) communications.
[GMBLCommunicationManager stopReceivingCommunications];
The following creates a communicationManager object and will trigger the callback to your
delegate of communications. Thereafter, you will be notified of
communications for places your application is authorized for.
Note By default Gimbal Place Events will be presented as UILocalNotifications if the GMBLCommunicationManager is initialized. You can change this behavior by using the GMBLCommunicationManagerDelegate
    #import <Gimbal/Gimbal.h>
    ...
    @property (nonatomic) GMBLCommunicationManager *communicationManager;
    ...
    self.communicationManager = [GMBLCommunicationManager new];
    self.communicationManager.delegate = self;
    [GMBLCommunicationManager startReceivingCommunications];
Note Be sure to add the CommunicationManager Delegate protocol to your class.
Registering to receive Remote Notifications is a three step process that your app should take every time it is launched.
    #import <Gimbal/Gimbal.h>
    ...

    - (void)applicationDidFinishLaunching:(UIApplication *)app
    {
      // other setup tasks here....

      // Register the supported interaction types.
        UIUserNotificationType types = UIUserNotificationTypeBadge |
                    UIUserNotificationTypeSound | UIUserNotificationTypeAlert;
        UIUserNotificationSettings *mySettings =
                    [UIUserNotificationSettings settingsForTypes:types categories:nil];
        [[UIApplication sharedApplication] registerUserNotificationSettings:mySettings];

      // Register for remote notifications.
        [[UIApplication sharedApplication] registerForRemoteNotifications];
    }

    // Handle remote notification registration.
    - (void)application:(UIApplication *)app
            didRegisterForRemoteNotificationsWithDeviceToken:(NSData *)deviceToken
    {
        [Gimbal setPushDeviceToken:deviceToken];
    }

    - (void)application:(UIApplication *)app
            didFailToRegisterForRemoteNotificationsWithError:(NSError *)err
    {
        NSLog(@"Error in registration. Error: %@", err);
    }
You can read more about this process in the Apple Documentation.
Note The Apple Documentation includes more advanced topics such as how to schedule Actionable Notifications.
This call parses a GMBLCommunication from a UILocalNotification. When a Gimbal Place Event generates a UILocalNotification and the user clicks on it you can use this call to parse out the Gimbal Communication.
Deprecated in iOS 10 Please use the UserNotificaiton Framework in iOS 10 and up.
    #import <Gimbal/Gimbal.h>
    ...

    - (void)application:(UIApplication *)application didReceiveLocalNotification:(UILocalNotification *)notification
    {
        GMBLCommunication *communication = [GMBLCommunicationManager communicationForLocalNotification:notification];
    }
This call parses a GMBLCommunication from a Remote Notification. When a remote notification is generated by the Gimbal Manager and the user clicks on it, you can use this call to parse out the Gimbal Communication.
Deprecated in iOS 10 Please use the UserNotificaiton Framework in iOS 10 and up.
    #import <Gimbal/Gimbal.h>
    ...
    - (void)application:(UIApplication *)application didReceiveRemoteNotification:(NSDictionary *)userInfo
    {
        GMBLCommunication *communication = [GMBLCommunicationManager communicationForRemoteNotification:userInfo];
    }
This call parses a GMBLCommunication from a Notification Response. When a User Notification in iOS 10 is generated by the Gimbal Manager and the user clicks on it you can use this call to parse out the Gimbal Communication.
    #import <Gimbal/Gimbal.h>
    #import <UserNotifications/UserNotifications.h>

    ...

    UNUserNotificationCenter *center = [UNUserNotificationCenter currentNotificationCenter];
    center.delegate = self;
    ...

    - (void)userNotificationCenter:(UNUserNotificationCenter *)center didReceiveNotificationResponse:(UNNotificationResponse *)response
                withCompletionHandler:(void(^)())completionHandler {
        GMBLCommunication *communication = [GMBLCommunicationManager communicationForNotificationResponse:response];
        completionHandler();
    }
This is the callback delegate for communication notifications.
Note You must add the <GMBLCommunicationManagerDelegate>
protocol to your class.
The following callback will be invoked when a place communication event occurs. The callback provides the opportunity to filter which communications will be presented as local notifications.
    #import <Gimbal/Gimbal.h>
    ...
    - (NSArray *)communicationManager:(GMBLCommunicationManager *)manager
presentLocalNotificationsForCommunications:(NSArray *)communications
                             forVisit:(GMBLVisit *)visit
    {
        // This will be invoked when a user has a communication for the place that was entered or exited.
        // Return an array of communications you would like presented as local notifications.
        // If you implement this method to filter communications, you MUST handle frequency limiting and delay yourself.

        return communications;
    }

    - (UILocalNotification *)communicationManager:(GMBLCommunicationManager *)manager
                    prepareNotificationForDisplay: (UILocalNotification *)notification
                                 forCommunication:(GMBLCommunication *)communication

    {
        // Deprecated in iOS 10! Please use the UserNotifications Framework in iOS 10 and up.

        // This method will be invoked when a communicate is received for a place event and after the communications
        // have been returned from communicationManager:presentLocalNotificationsForCommunications:forVisit:
        // if implemented. The caller is given a chance to customize this notification.
        // Caller should return a customized UILocalNotification for the SDK to use for the notification.
        // SDK will use the default notification if null is returned from this method.

        return notification;
    }

    - (UNMutableNotificationContent *)communicationManager:(GMBLCommunicationManager *)manager
                      prepareNotificationContentForDisplay:(UNMutableNotificationContent *)notificationContent
                                          forCommunication:(GMBLCommunication *)communication
                                                  forVisit:(GMBLVisit *)visit;
    {

        // This method will be invoked when a communicate is received for a place event and after the communications
        // have been returned from communicationManager:presentLocalNotificationsForCommunications:forVisit:
        // if implemented. The caller is given a chance to customize this notification.
        // Caller should return a customized UNMutableNotificationContent for the SDK to use for the notification.
        // SDK will use the default notification if null is returned from this method.

        return notificationContent;
    }
The GMBLVisit class defines a visit to a place. It includes the place, the arrival date and the departure date to the place. If the visit is currently on-going, the departure date will be nil.
| Property Name | Type | Description |
|---|---|---|
| arrivalDate | NSDate | Arrival date for the visit |
| departureDate | NSDate | Departure date for the visit |
| place | GMBLPlace | Place associated with visit |
The GMBLPlace class defines a place which is represented by a geofence (circular or polygonal) or a series of beacons. A place is defined in the Gimbal Manager portal.
| Property Name | Type | Description |
|---|---|---|
| identifier | NSString | Unique identifier for this place |
| name | NSString | Name assigned to this place |
| attributes | GMBLAttributes | Attributes of this place |
The GMBLCommunication class defines a communication that was defined on the Gimbal Manager Portal.
| Property Name | Type | Description |
|---|---|---|
| identifier | NSString | Unique identifier for this communication |
| title | NSString | Title for this communication |
| descriptionText | NSString | Description for this communication |
| URL | NSString | URL for this communication |
| deliveryDate | NSDate | Scheduled Delivery Date for this communication |
| expiryDate | NSDate | Expiry date for this communication |
| attributes | GMBLAttributes | Attributes of this communication |
This call creates a beaconManager object and assigns the delegate class.
    #import <Gimbal/Gimbal.h>
    ...
    @property (nonatomic) GMBLBeaconManager *beaconManager;
    ...
    self.beaconManager = [GMBLBeaconManager new];
    self.beaconManager.delegate = self;
Note Be sure to add the BeaconManager Delegate protocol to your class.
Starts listening to beacon sighting which would generate events based on the users proximity to beacons. You will be notified of sightings for beacons your application is authorized for.
    #import <Gimbal/Gimbal.h>
    ...
    [self.beaconManager startListening];
Stops listening to beacon sightings which would generate events based on the users proximity to beacons.
    #import <Gimbal/Gimbal.h>
    ...
    [beaconManager stopListening];
This is the callback delegate for beacon manager.
Note You must add the <GMBLBeaconManagerDelegate>
protocol to your class.
The following callbacks will be invoked when a beacon sighting occurs.
    #import <Gimbal/Gimbal.h>
    ...
    - (void)beaconManager:(GMBLBeaconManager *)manager didReceiveBeaconSighting:(GMBLBeaconSighting *)sighting
    {
        //This will be invoked when a user sights a beacon
    }
The GMBLBeaconSighting class defines a beacon sighting.
| Property Name | Type | Description |
|---|---|---|
| RSSI | NSInteger | The rssi value for the beacon sighted |
| date | NSDate | The field representing the beacon sighted date |
| beacon | GMBLBeacon | The beacon object with beacon attributes |
The GMBLBeacon class defines a beacon that was defined on the Gimbal Manager Portal.
| Property Name | Type | Description |
|---|---|---|
| identifier | NSString | A unique string identifier (factory id) |
| uuid | NSString | A universally unique identifier (uuid) |
| name | NSString | The name for the GMBLBeacon that can be assigned via the Gimbal Manager |
| iconURL | NSString | The iconUrl |
| batteryLevel | GMBLBatteryLevel | The battery level |
| temperature | NSInteger | The ambient temperature surrounding the Beacon in Fahrenheit. The value will be NSIntegerMax if no temperature sensor is present on this beacon. |
The EstablishedLocations Manager defines the interface for enabling the Established Locations feature in the Gimbal SDK. Once enabled, Gimbal will passively monitor for locations commonly visited by the user. Each location inferred in this way is scored by a relevance value.
Check if established locations has been enabled.
    #import <Gimbal/Gimbal.h>
    ...
    GMBLEstablishedLocationManager.isMonitoring;
Enables the passive collection of Established Locations.
    #import <Gimbal/Gimbal.h>
    ...
    GMBLEstablishedLocationManager.startMonitoring;
Disables the passive collection of Established Locations.
    #import <Gimbal/Gimbal.h>
    ...
    GMBLEstablishedLocationManager.stopMonitoring;
Retrieve the Established Locations inferred by the Gimbal SDK for the user. Each Established Location contains a boundary represented by a geographical Circle (with a center latitude/longitude and radius in meters). In addition, each location is accompanied by a score representing the relevance of the location to the user. A higher score value dictates higher relevancy.
    #import <Gimbal/Gimbal.h>
    ...
    for (GMBLEstablishedLocation *establishedLocation in GMBLEstablishedLocationManager.establishedLocations) {
        NSLog.info(@"Established Location: %@", [establishedLocation description]);
    }
The EstablishedLocation class defines a commonly visited location of the user. It contains a relevancy score and a boundary defining the geographical features.
| Method | Description |
|---|---|
| score | returns the score of the EstablishedLocation; a higher score value indicates that this location is more relevant to the user |
| boundary | returns the Circle representing the boundary of the EstablishedLocation |
| description | returns the attributes of the EstablishedLocation and its boundary in a String |
A geographical circle.
| Method | Description |
|---|---|
| center | returns the Coordinate representing the center of the Circle |
| radius | returns the radius of the Circle, in meters |
The Coordinate class represents a latitude and longitude.
| Method | Description |
|---|---|
| latitude | returns the latitude of the Coordinate |
| longitude | returns the longitude of the Coordinate |
Requires SDK 2.62+ The Device Attribute Manager allows you to associate attributes specific to the user of that individual device.
Attributes can be set by passing in a dictionary to setDeviceAttributes:. The call will return "true" if setting was successful, or "false" if there was a problem with encoding one of the elements. The passed in dictionary will remove and override the existing attributes. Passing in nil or an empty dictionary will remove the attributes associated with specific device.
#import <Gimbal/Gimbal.h>
...
NSDictionary *attributes = @{
    @"key1":@"value1",
    @"key2":@"value2",
};
GMBLDeviceAttributeManager *attributeManager = [GMBLDeviceAttributeManager new];
[attributeManager setDeviceAttributes:attributes];
The current attributes for a device can be retrieved through getDeviceAttributes.
#import <Gimbal/Gimbal.h>
...
GMBLDeviceAttributeManager *attributeManager = [GMBLDeviceAttributeManager new];
NSDictionary *attributes = [attributeManager getDeviceAttributes];
Important Only use this API if you intend to reset the Application Instance Identifier for this SDK instance. Normally this is not required.
This call dissociates a device and data (place events) reported by the application running on that device. The open place sightings gets closed on server. Data on device also gets cleared due to this API invocation.
#import <Gimbal/Gimbal.h>
...
[Gimbal resetApplicationInstanceIdentifier];
For information on default beacon configurations and how to assign and push a configuration, please refer to the link provided
To properly receive Gimbal Proximity events in the background your application needs to enable the following iOS background modes.
bluetooth-centralIn the foreground your application should be notified for most Gimbal Proximity Events that originate from a beacon. In the background this is not the case. In the background the device receives Bluetooth LE events much less frequently.
The following table shows how long it takes to receive an Arrive event from our VisitManager
based on the testing we've done on iOS devices.
| Beacon Configuration | Average Time to Arrive (seconds) | Standard Deviation (seconds) |
|---|---|---|
| S21 Recommended Config | 12 | 7 |
| US5 Recommended Config | 12 | 7 |