This guide provides a quick start documentation on how to use v2 SDK in a swift project by using Objective-C bridging header. It also provides sample swift code for key SDK features. For complete documentation, please refer to the ios v2 Developer Guide. »
The following steps will set up an application in Xcode ready for enabling Gimbal features.
Make sure you are:
In Xcode choose File > New > Project and create a new iOS Application
In your project options, please choose "Swift" as the Language
Important Right click the Project name and choose the Add files to ... option to add the framework.
Note You will find this framework in the
Frameworks folder inside the Gimbal SDK zip file.
Please select the checkbox for Copy items if needed.
The Linked Frameworks and Libraries in your General tab should now look like this.
Verify also that the Gimbal Framework Target Membership checkbox is set.

Gimbal SDK for iOS uses both Significant Location Change and Region Monitoring features of the iOS. In order to allow for this, multiple entries are required in the property list. In the Info.plist file located in the 'Supporting Files' folder, add new entries with keys 'NSLocationAlwaysAndWhenInUseUsageDescription', and 'NSLocationWhenInUseUsageDescription'. The values should contain a user visible string describing the app’s need for location permissions.
Starting in iOS 10, Apple requires addition permissions for using Bluetooth peripherals, such as Gimbal Beacons. Similar to before, add a new entry to your Info.plist with a key of 'NSBluetoothPeripheralUsageDescription' and value as the descriptions as to why you are using Bluetooth peripherals.
Starting in iOS 11, Apple will prompt users with the "Always" and "When In Use" location options. You can request only the "Always" location permission instead of "When In Use" on iOS 10 and below, which is managed by the "NSLocationAlwaysUsageDescription" property.
| Key | Type | Value |
|---|---|---|
| NSLocationAlwaysAndWhenInUseUsageDescription | String | Location is used to monitor Gimbal Places |
| NSLocationWhenInUseUsageDescription | String | Location is used to monitor Gimbal Places |
| NSLocationAlwaysUsageDescription | String | Location is used to monitor Gimbal Places |
| NSBluetoothPeripheralUsageDescription | String | Bluetooth is used to listen for Gimbal Beacons |
Xcode allows you to mix swift and obj-c into the same project by using bridging header which exposes those files to Swift. Any public Objective-C headers imported here will be visible to Swift.
In Xcode choose File > New > File... and from the left column, ensure iOS > Source is selected then choose Header File on the right column. Please ensure the appropriate target is set when creating the Header file.
In the header file, please add the following line
#import <Gimbal/Gimbal.h>
In Xcode, from the Build Settings in the Swift Compiler - Code Generation section, ensure the following values are set:
Note Ensure that in Packaging section, the Define Module is set to Yes
Create Your Gimbal Application in the Gimbal Manager.
You will be presented with a form where you will enter the following information: Name of your app, Platform (ios), App category, and Bundle ID.
Note This is where you would enter the Xcode application Bundle ID created in the previous section 'Create Your iOS Application'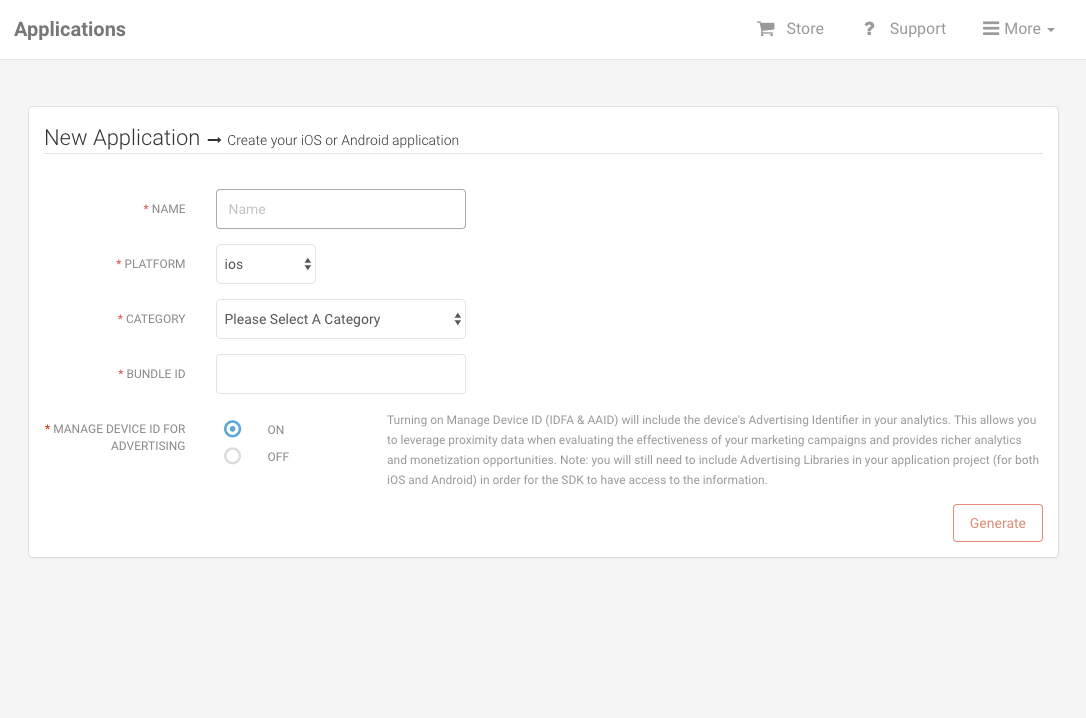
Hit the 'Generate' button. Once finished, your app will have a Gimbal API Key.
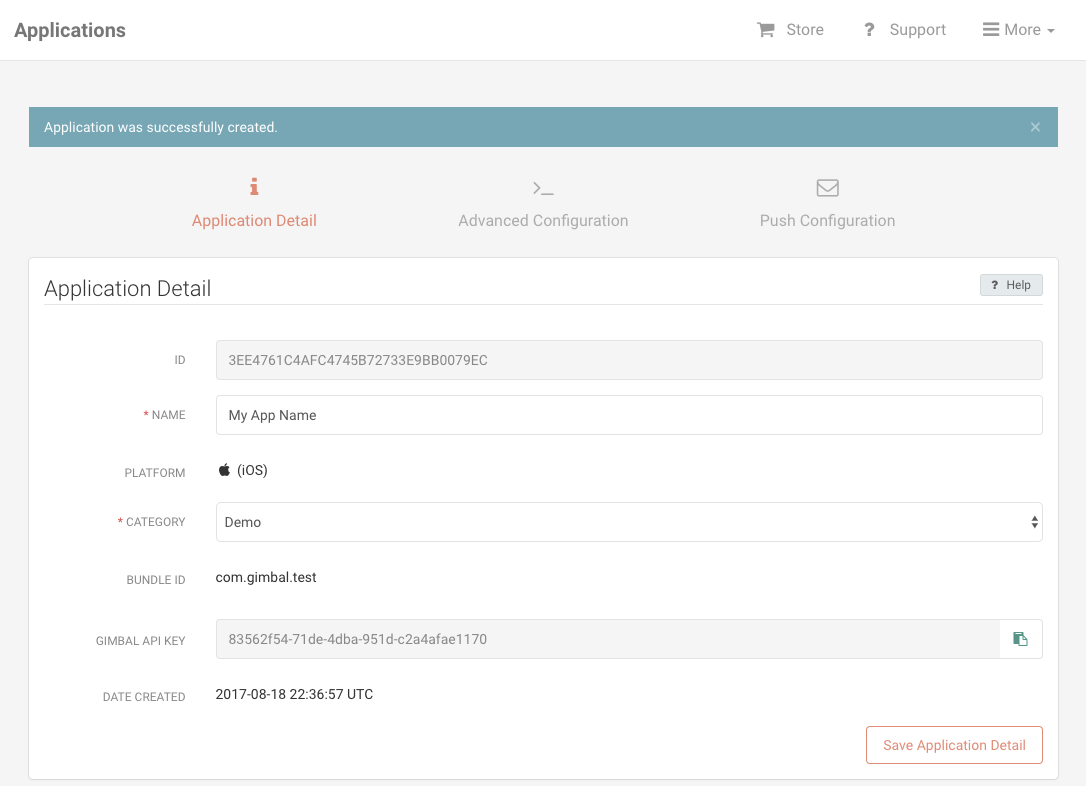
Important You will need to set the API Key in your Xcode App
You will be presented with a form where you will enter information about your Place. A Place represents both Geofence and Proximity. For example, a place can be represented by a geofence (circular or polygonal) or a series of beacons.
Please enter your Place information. For example, you can enter a Place name and enter your activated beacon(s). You can always update your Place by adding a Geofence or add/delete your beacons.
Note This is where you would enter the Place(s) where you will look for Place Events in your app.
You will be presented with a form where you will enter information about your communication. For example a Communication can be entered for a place and when an app enters the specified place, a notification will be received. Please select 'Save & Publish' to activate your communication.

This call sets the API key for your Gimbal application. When you register an application on the Developer Portal the API key is generated and supplied to you.
This was done in the previous section Create Gimbal Application.
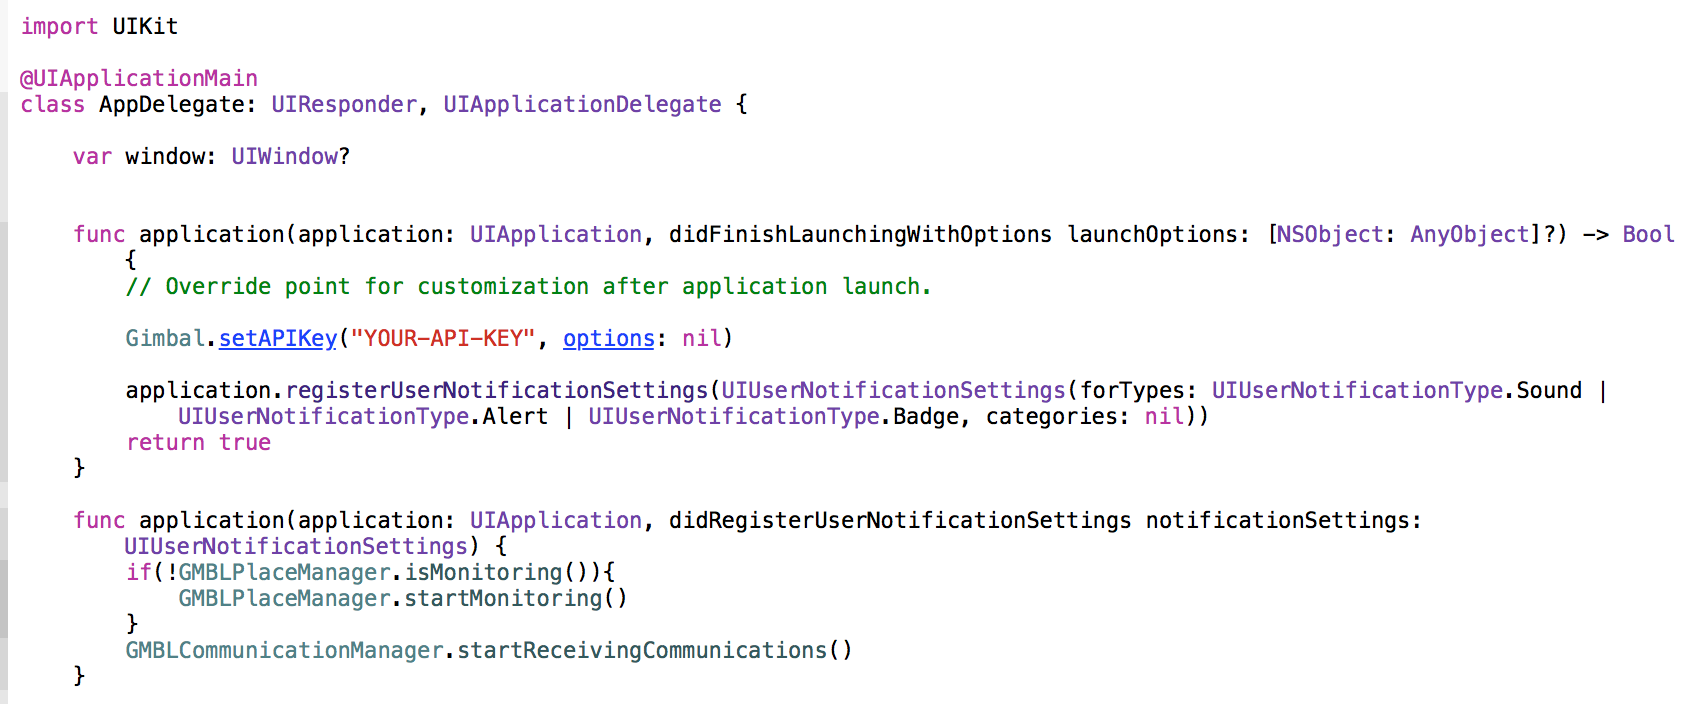
Gimbal.setAPIKey("PUT_YOUR_GIMBAL_API_KEY_HERE", options: nil)
setAPIKey also prompts the user for access to their location. By default the user will be prompted with the options "Always", "While in use" or "Never". You can manage this request on your own in the options parameter by setting the key MANAGE_PERMISSIONS with a value of false. You will then need to ask for location access on your own.
Gimbal.setAPIKey("PUT_YOUR_GIMBAL_API_KEY_HERE", options: ["MANAGE_PERMISSIONS":false])
Note You can add this code in your AppDelegate (.swift) file in the application didFinishLaunchingWithOptions: method, inserting your specific API Key
This call dissociate a device and data (place events) reported by the application running on that device. The open place sightings gets closed on server. Data on device also gets cleared due to this API invocation.
Gimbal.resetApplicationInstanceIdentifier()
The PlaceManager defines the interface for delivering place entry and exits events to your Gimbal SDK enabled application. You use this class to start or stop place monitoring and to check whether monitoring is enabled.
Check if place monitoring has started
GMBLPlaceManager.isMonitoring()
Starts the generation of events based on the users location and proximity to geofences and beacons.
GMBLPlaceManager.startMonitoring()
Stops the generation of events based on the users location and proximity to geofences and beacons.
GMBLPlaceManager.stopMonitoring()
The following creates a placeManager object and will trigger the callback to your
delegate of place events. Thereafter, you will be notified of
events for places your application is authorized for.
    var placeManager: GMBLPlaceManager
    ...

    placeManager = GMBLPlaceManager()
    ...

    placeManager.delegate = self
Note Be sure to add the PlaceManager Delegate protocol to your class.
This is the callback delegate for place events.
Note You must add the <GMBLPlaceManagerDelegate>
protocol to your class.
The following callbacks will be invoked when a place event occurs.
    func placeManager(manager: GMBLPlaceManager, didBeginVisit visit: GMBLVisit) {
        // this will be invoked when a place is entered
    }

    func placeManager(manager: GMBLPlaceManager, didEndVisit visit: GMBLVisit) {
        // this will be invoked when a place is exited
    }

    func placeManager(manager: GMBLPlaceManager, didDetectLocation location: CLLocation) {
        // This will be invoked when Gimbal has detected a reliable location.
    }
The GMBLVisit class defines a visit to a place. It includes the place, the arrival date and the departure date to the place. If the visit is currently on-going, the departure date will be nil.
| Property Name | Type | Description |
|---|---|---|
| arrivalDate | NSDate | Arrival date for the visit |
| departureDate | NSDate | Departure date for the visit |
| place | GMBLPlace | Place associated with visit |
The GMBLPlace class defines a place which is represented by a geofence (circular or polygonal) or a series of beacons. A place is defined in the Gimbal Manager portal.
| Property Name | Type | Description |
|---|---|---|
| identifier | NSString | Unique identifier for this place |
| name | NSString | Name assigned to this place |
| attributes | GMBLAttributes | Attributes of this place |
The CommunicationManager defines the interface for delivering communications to your Gimbal SDK enabled application. You use this class to start or stop receiving communications.
Enables the SDK to receive communications.
GMBLCommunicationManager.startReceivingCommunications()
The following creates a communicationManager object and will trigger the callback to your
delegate of communications. Thereafter, you will be notified of
communications for places your application is authorized for.
Note By default Gimbal Place Events will be presented as UILocalNotifications if the GMBLCommunicationManager is initialized. You can change this behavior by using the GMBLCommunicationManagerDelegate
    var commManager: GMBLCommunicationManager
    ...

    commManager = GMBLCommunicationManager()
    ...

    commManager.delegate = self
Note Be sure to add the CommunicationManager Delegate protocol to your class.
This call parses a GMBLCommunication from a UILocalNotification. For example, when a Gimbal Place Event generates a UILocalNotification and the user clicks on it you can use this call to parse out the Gimbal Communication.
GMBLCommunicationManager.communicationForLocalNotification(notification)
This is the callback delegate for communication notifications.
Note You must add the <GMBLCommunicationManagerDelegate>
protocol to your class.
The following callback will be invoked when a place communication event occurs. The callback provides the opportunity to filter which communications will be presented as local notifications.
    func communicationManager(manager: GMBLCommunicationManager, presentLocalNotificationsForCommunications communications: [AnyObject]!, forVisit visit: GMBLVisit!) -> [AnyObject]!{

          for comm in communications{
            // This will be invoked when a user has a communication for the place that was entered or exited.
            // Return an array of communications you would like to have presented as local notifications.
            // Do not return any communications whose scheduling and delivery will be handled by your app.
          }

        return communications
    }
The GMBLVisit class defines a visit to a place. It includes the place, the arrival date and the departure date to the place. If the visit is currently on-going, the departure date will be nil.
| Property Name | Type | Description |
|---|---|---|
| arrivalDate | NSDate | Arrival date for the visit |
| departureDate | NSDate | Departure date for the visit |
| place | GMBLPlace | Place associated with visit |
The GMBLPlace class defines a place which is represented by a geofence (circular or polygonal) or a series of beacons. A place is defined in the Gimbal Manager portal.
| Property Name | Type | Description |
|---|---|---|
| identifier | NSString | Unique identifier for this place |
| name | NSString | Name assigned to this place |
| attributes | GMBLAttributes | Attributes of this place |
The GMBLCommunication class defines a communication that was defined on the Gimbal Manager Portal.
| Property Name | Type | Description |
|---|---|---|
| identifier | NSString | Unique identifier for this communication |
| title | NSString | Title for this communication |
| descriptionText | NSString | Description for this communication |
| URL | NSString | URL for this communication |
| expiry date | NSDate | Expiry date for this communication |
| attributes | GMBLAttributes | Attributes of this communication |
The following code snippets shows sample implementation that provides a simple log of place and communication events

For information on default beacon configurations and how to assign and push a configuration, please refer to the link provided
To properly receive Gimbal Proximity events in the background your application needs to enable the following iOS background modes.
bluetooth-centralIn the foreground your application should be notified for most Gimbal Proximity Events that originate from a beacon. In the background this is not the case. In the background the device receives Bluetooth LE events much less frequently.
The following table shows how long it takes to receive an Arrive event from our VisitManager
based on the testing we've done on iOS devices.
| Beacon Configuration | Average Time to Arrive (seconds) | Standard Deviation (seconds) |
|---|---|---|
| S21 Recommended Config | 12 | 7 |
| US5 Recommended Config | 12 | 7 |